If you’re dreaming of a garden that turns heads while being eco-friendly, using recycled bricks for borders is one of the simplest and most creative solutions. Not only do recycled bricks give your garden a rustic, timeless charm, but they also help you reduce waste and reuse materials that might otherwise end up in a landfill. In this guide, we’ll explore how to transform your garden with recycled bricks, step by step, while providing inspiration for a stunning border design that will enhance your outdoor space.
Why Choose Recycled Bricks for Your Garden Border?
Before diving into the practical steps, it’s important to understand why recycled bricks are an excellent choice for garden borders:
- Eco-Friendly and Sustainable
By using bricks that have already served their purpose in construction, you reduce the need for new manufacturing, which saves energy and reduces carbon emissions. Each brick you reuse contributes to a more sustainable gardening practice. - Cost-Effective
Purchasing new bricks can be expensive, especially if you need hundreds to outline flower beds, pathways, or vegetable gardens. Recycled bricks are often cheaper or even free, allowing you to invest your gardening budget in plants and soil improvements instead. - Durable and Long-Lasting
Bricks are renowned for their durability. Unlike wooden borders that rot or metal edges that rust, bricks can withstand weather conditions for decades. Recycled bricks, having already weathered the elements, are often even more resilient. - Aesthetic Appeal
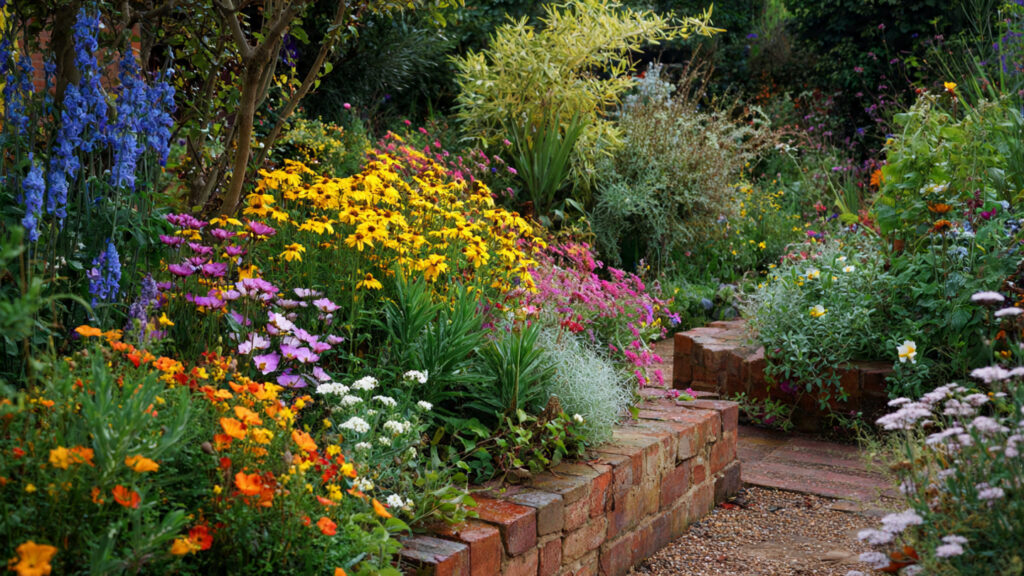
Each recycled brick carries a story. Variations in color, texture, and shape add a unique, charming character to your garden border. Whether you prefer a rustic, classic, or eclectic style, bricks offer a versatile solution.
Planning Your Brick Border
Proper planning is key to a professional-looking garden border. Here’s how to start:
- Measure Your Space
Use a tape measure to outline the area you want to border. Mark the perimeter with string or chalk to visualize the shape. Consider whether you want straight lines, curves, or a combination. - Choose Your Brick Style
Recycled bricks come in various sizes, colors, and textures. Some may be slightly chipped, which adds rustic charm. You can mix different brick types for a more eclectic look or select uniform bricks for a clean, structured border. - Decide on Height and Depth
Most garden borders are 2–3 bricks high, but you can adjust depending on the type of plants you have. Taller borders can support climbing plants or prevent soil erosion. Plan the depth based on the width of your border and the stability needed. - Prepare the Ground
A solid foundation ensures that your bricks stay in place over time. Clear the area of grass, weeds, and debris. Level the soil and consider adding a layer of sand or gravel to provide a stable base and improve drainage.
Step-by-Step Guide to Creating a Stunning Brick Border
Now comes the fun part: building your border. Follow these steps for a professional and eye-catching finish.
Step 1: Lay the Foundation
Start by creating a solid, level base. Spread a layer of gravel about 1–2 inches thick along the marked area. Compact the gravel using a tamper or a heavy flat object to ensure stability. Next, add a thin layer of sand on top, smoothing it evenly with a trowel. This will help your bricks settle evenly and prevent wobbling.
Step 2: Arrange the Bricks
Place the first row of bricks directly on the sand layer. Take your time to ensure each brick is level and snug against its neighbor. Use a rubber mallet to tap bricks into place without cracking them. For curved borders, gently trim or angle bricks as needed to follow the shape.
Step 3: Stack and Secure
If your design includes multiple layers, stack additional rows carefully, staggering joints for a stronger structure. This technique, known as “running bond,” not only adds stability but also enhances visual appeal. For extra security, apply a thin layer of mortar between bricks if you want a more permanent installation. However, dry stacking (without mortar) is perfectly acceptable for flexible borders and easier future adjustments.
Step 4: Fill Gaps and Compact Soil
After laying all the bricks, fill gaps between them with sand or soil to prevent shifting. Compact the soil around the edges to lock bricks in place. If desired, plant low-growing ground cover or creeping plants between bricks to soften edges and add greenery.
Step 5: Add Decorative Finishing Touches
The final step is all about personalization. You can:
- Mix Brick Colors: Combine red, brown, and cream bricks for a vibrant, patchwork effect.
- Incorporate Pebbles or Gravel: Add a small layer of pebbles inside the border for a tidy, finished look.
- Highlight with Plants: Plant flowers or herbs along the border to enhance the visual impact. Consider perennials like lavender, thyme, or marigolds for low-maintenance beauty.
Creative Ideas for Using Recycled Brick Borders
Once you understand the basics, the possibilities are endless. Here are some creative ways to use your recycled brick border:
- Flower Bed Frames
Give your flowers a structured, eye-catching edge that prevents soil from spilling onto paths. - Vegetable Garden Boundaries
Define your vegetable patches while keeping soil and mulch neatly contained. - Pathways and Walkways
Use bricks to create charming garden paths that complement your landscape. - Raised Planters
Stack bricks higher to form raised beds. This adds dimension to your garden and improves drainage for plants. - Edging Around Trees or Shrubs
Protect your trees and shrubs with brick borders while adding a decorative element.
Tips for Maintaining Your Brick Garden Borders
While bricks are low-maintenance, a few simple practices will keep your borders looking fresh for years:
- Clean Regularly: Remove moss, dirt, or weeds growing between bricks using a stiff brush or pressure washer.
- Re-Level if Needed: Over time, some bricks may shift. Simply lift and re-level them to maintain a uniform appearance.
- Seal for Extra Protection: Applying a brick sealant can prevent staining and enhance color, especially for highly visible borders.
Benefits Beyond Beauty
A recycled brick border offers more than just aesthetic value. It also:
- Improves Soil Retention: Keeps soil in place around plants, reducing erosion.
- Defines Garden Zones: Clearly separates different garden areas, making your space more organized.
- Adds Value: A well-designed garden border can increase curb appeal and property value.
Final Thoughts
Transforming your garden with recycled bricks is an environmentally friendly, affordable, and visually striking solution. From planning to execution, the process is straightforward and offers countless opportunities for creativity. With a little effort, you can create a stunning border that not only enhances your garden’s charm but also reflects your commitment to sustainability.
Whether you’re aiming for rustic elegance, modern simplicity, or a vibrant eclectic look, recycled brick borders offer timeless appeal. So gather your bricks, get creative, and watch your garden transform into a picturesque outdoor sanctuary that’s as durable as it is beautiful.
➡️ How to Grow Malabar Spinach from Cuttings for Fast, Easy Greens
➡️ How to Grow Super Delicious Cabbage at Home Without a Garden
➡️ How to Grow Bean Sprouts at Home in Plastic Bottles Easily (Step‑by‑Step Guide)
➡️ Why is Your Lemon Tree Blooming in the Heart of Winter?
➡️ Why Should Your Garden Have a Dedicated Pollinator Highway?
➡️ Why Do Your Fruit Trees Need a Winter Wash to Thrive in Spring?
➡️ How Can Rice Water Transform Your Fruits into Sweeter Delights?
➡️ Jumpstart Your Winter Garden: Seed Starting Under Lights