In today’s fast-paced urban lifestyle, not everyone has access to a spacious garden. However, the love for greenery and gardening doesn’t have to be limited by space. Bottle gardens, also known as terrariums, offer an innovative way to cultivate plants in small areas such as apartments, offices, or even kitchen counters. These miniature ecosystems are not only visually appealing but also require minimal maintenance, making them perfect for beginners and experienced gardeners alike. This guide will show you how to make a bottle garden and transform your small space into a thriving, green haven.
What is a Bottle Garden?
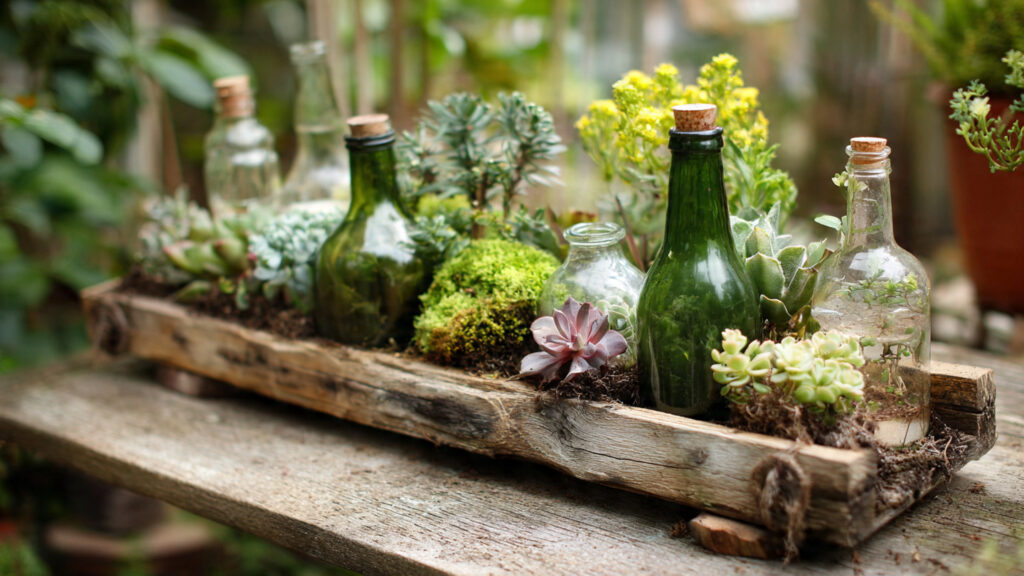
A bottle garden is a small-scale ecosystem created within a transparent container, usually a glass bottle, jar, or vase. By enclosing plants in a glass environment, you create a self-sustaining system where moisture, air, and nutrients cycle naturally.
Key features of a bottle garden include:
- Compact Size: Ideal for small spaces where traditional gardening isn’t feasible.
- Visual Appeal: Glass containers allow you to see soil layers, roots, and plants, creating a decorative piece.
- Low Maintenance: Closed systems often recycle water, reducing the need for frequent watering.
- Educational Value: Perfect for teaching children about plant growth, ecosystems, and sustainability.
Understanding the concept of a bottle garden is the first step toward creating a beautiful mini-garden in your own home.
Materials You Will Need
Creating a bottle garden is simple and inexpensive. Here’s a checklist of essential materials:
- Transparent Container: A glass bottle, jar, vase, or even a recycled wine bottle works perfectly. Choose a container with a wide mouth for easier planting.
- Small Rocks or Pebbles: Used for drainage at the bottom to prevent waterlogging.
- Activated Charcoal: Helps keep the environment fresh and prevents mold or odor.
- Potting Soil: Use a light, well-draining soil suitable for small plants.
- Plants: Choose slow-growing, small plants like moss, ferns, air plants, succulents, or miniature tropical plants.
- Decorative Elements (Optional): Small figurines, shells, colored sand, or decorative stones for aesthetic appeal.
- Tools: Tweezers, a small spoon, or a funnel to place materials neatly inside the container.
With these materials, you’re ready to start assembling your bottle garden.
Step-by-Step Guide to Making a Bottle Garden
Follow these steps to create a thriving mini-garden in your bottle:
Step 1: Clean the Container
Before planting, wash your glass container thoroughly with warm water and mild soap. This removes dust, bacteria, and residues that could harm your plants. Rinse well and let it dry completely.
Step 2: Add a Drainage Layer
Place a layer of small rocks or pebbles at the bottom of the container, about 1–2 inches deep, depending on the size of your bottle. This layer prevents excess water from stagnating, which can cause root rot.
Step 3: Add Activated Charcoal
Sprinkle a thin layer of activated charcoal on top of the rocks. This keeps the soil fresh, reduces odors, and prevents fungal growth. Activated charcoal is especially important for closed bottle gardens where airflow is limited.
Step 4: Add Potting Soil
Add a layer of potting soil on top of the charcoal. For most small plants, a 2–3 inch layer is sufficient. Gently pat down the soil, but avoid compacting it too much, as roots need space to breathe and grow.
Step 5: Plant Your Greenery
Carefully plant your chosen plants in the soil. Use tweezers or a small spoon for precise placement. Arrange taller plants in the center and smaller or ground-cover plants around the edges for visual balance.
Step 6: Decorate (Optional)
Add decorative elements like moss, small figurines, colored sand, or tiny stones. Not only does this enhance the visual appeal, but it also creates a theme or story inside your bottle garden.
Step 7: Water Lightly
Use a spray bottle or small spoon to water your plants gently. Closed bottle gardens usually require less water, as moisture recycles inside the container. Open bottle gardens may need slightly more frequent watering, depending on the plants you choose.
Step 8: Seal or Leave Open
Decide whether you want a closed or open bottle garden:
➡️ How to Grow Malabar Spinach from Cuttings for Fast, Easy Greens
➡️ How to Grow Super Delicious Cabbage at Home Without a Garden
➡️ How to Grow Bean Sprouts at Home in Plastic Bottles Easily (Step‑by‑Step Guide)
➡️ Why is Your Lemon Tree Blooming in the Heart of Winter?
➡️ Why Should Your Garden Have a Dedicated Pollinator Highway?
➡️ Why Do Your Fruit Trees Need a Winter Wash to Thrive in Spring?
➡️ How Can Rice Water Transform Your Fruits into Sweeter Delights?
➡️ Jumpstart Your Winter Garden: Seed Starting Under Lights
- Closed Bottle Garden: Retains moisture and creates a self-sustaining environment. Only water occasionally.
- Open Bottle Garden: Offers more airflow, suitable for succulents or plants that prefer drier conditions.
Step 9: Place in Proper Light
Position your bottle garden in indirect sunlight. Direct sunlight can overheat the glass and harm your plants, while too little light will slow growth. Most plants thrive near windows with filtered sunlight.
Tips for Maintaining a Bottle Garden
A bottle garden is low-maintenance but requires some attention to stay healthy and thriving:
- Monitor Moisture: Condensation on the glass indicates adequate humidity. If there’s too much water, remove the lid temporarily or adjust watering.
- Trim Plants as Needed: Prune dead leaves or overgrown plants to maintain a tidy and balanced look.
- Clean the Glass: Wipe the inside and outside of the container occasionally to keep your bottle garden looking fresh.
- Fertilize Sparingly: Closed bottle gardens rarely need fertilizer. For open gardens, a diluted liquid fertilizer can be applied every few months.
- Rotate Periodically: Turn the bottle occasionally to ensure all plants receive equal light and grow evenly.
By following these tips, your bottle garden can thrive for months or even years.
Creative Ideas for Bottle Gardens
Bottle gardens are a fantastic way to express creativity. Here are some ideas to make your miniature garden truly unique:
- Themed Terrariums: Create seasonal or themed gardens with miniature figures, like fairy gardens, beach scenes, or forest landscapes.
- Layered Sand Gardens: Use colored sand to create visually striking layers beneath your plants.
- Succulent Arrangement: Mix different types of succulents with small stones for a low-maintenance, modern look.
- Mini Herb Garden: Grow small herbs like thyme, oregano, or basil in a bottle for a functional and decorative kitchen display.
These creative approaches make your bottle garden not just a plant display but also an artful conversation piece.
Benefits of Bottle Gardening
Beyond aesthetics, bottle gardening offers several advantages:
- Space-Saving: Perfect for apartments, desks, or small balconies.
- Educational: Demonstrates ecological principles and plant growth cycles.
- Stress-Relief: Caring for a mini-garden can reduce stress and improve mood.
- Sustainable Gardening: Encourages recycling of glass bottles and containers.
Bottle gardens prove that even in small spaces, you can enjoy the joys of gardening and connect with nature.
Conclusion
Creating a bottle garden is a rewarding and fun way to practice creative gardening in small spaces. With simple materials, a little patience, and attention to detail, you can transform a plain glass container into a thriving mini-ecosystem. From selecting the right plants to maintaining proper moisture and light, every step contributes to a flourishing garden that enhances your home or workspace.
Whether you choose a closed terrarium that recycles water naturally or an open bottle garden for succulents, your miniature garden can serve as a green oasis, a decorative piece, and a source of personal satisfaction. By following these steps and tips, anyone can enjoy the beauty and benefits of bottle gardening, regardless of space constraints.
Turn your small corner into a lush, vibrant garden in a bottle, and experience the magic of miniature gardening today!
I can also create an SEO-optimized version with 5–6 internal and external links and highlighted keywords to boost organic traffic for your blog.