Growing berry bushes from cuttings might sound like something only professional growers do—but it’s surprisingly simple. In fact, many popular berry plants root so easily that beginners often succeed on their very first try.
If you already grow berries, cuttings allow you to multiply your favorite plants for free. If you don’t, a single healthy branch from a friend’s garden can become the start of your own berry patch.
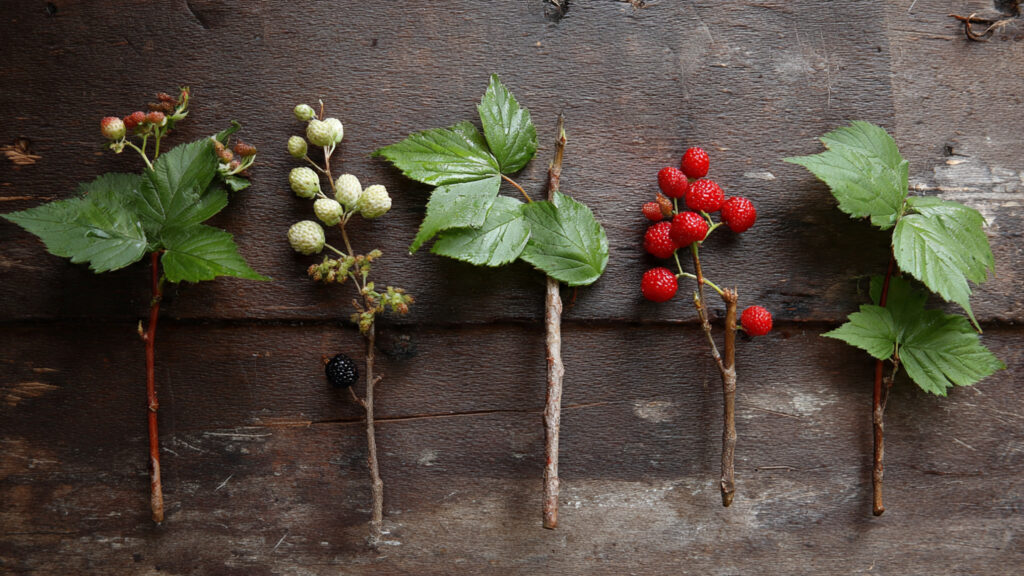
Whether you’re propagating Rubus idaeus, Vaccinium corymbosum, Ribes nigrum, or even trailing blackberries like Rubus fruticosus, the process follows a few simple principles.
Let’s walk step by step through how to start berry bushes from cuttings—and why it’s easier than you think.
Why Grow Berry Bushes from Cuttings?
Starting berries from cuttings has several advantages:
- Cost-effective: Free plants from existing ones
- Genetic consistency: New plants are identical to the parent
- Faster than seeds: Cuttings mature more quickly
- Reliable results: No guesswork with seed variation
When you propagate from cuttings, you’re cloning the plant. That means if you love the flavor, productivity, or disease resistance of a particular bush, you’ll get the same traits again.
Understanding the Types of Cuttings
Berry bushes can be propagated using three main types of cuttings:
1. Softwood Cuttings
Taken in late spring or early summer from fresh, flexible growth.
2. Semi-Hardwood Cuttings
Taken in mid-to-late summer when stems begin to firm up.
3. Hardwood Cuttings
Taken during late fall or winter from dormant, woody stems.
Most home gardeners find hardwood cuttings easiest, especially for raspberries, currants, and blackberries. Blueberries can root well from softwood or hardwood, depending on variety.
Step 1: Choose a Healthy Parent Plant
The success of your cutting begins with plant selection.
Choose a bush that is:
- Disease-free
- High yielding
- Well-established
- True to type (if variety matters)
Avoid weak or stressed plants. A cutting can only be as strong as the plant it came from.
Step 2: Take the Right Cutting
For Hardwood Cuttings (Winter Method)
- Select a one-year-old stem.
- Cut a section about 6–10 inches long.
- Ensure it contains at least 3–4 nodes (bud points).
- Make the bottom cut just below a node.
- Make the top cut slightly above a node.
Keep track of orientation—plant the bottom end in soil, not upside down.
➡️ How to Grow Malabar Spinach from Cuttings for Fast, Easy Greens
➡️ How to Grow Super Delicious Cabbage at Home Without a Garden
➡️ How to Grow Bean Sprouts at Home in Plastic Bottles Easily (Step‑by‑Step Guide)
➡️ Why is Your Lemon Tree Blooming in the Heart of Winter?
➡️ Why Should Your Garden Have a Dedicated Pollinator Highway?
➡️ Why Do Your Fruit Trees Need a Winter Wash to Thrive in Spring?
➡️ How Can Rice Water Transform Your Fruits into Sweeter Delights?
➡️ Jumpstart Your Winter Garden: Seed Starting Under Lights
Hardwood cuttings are especially successful with blackcurrants and raspberries.
For Softwood Cuttings (Spring Method)
- Choose fresh green growth that bends but doesn’t snap.
- Cut 4–6 inch sections.
- Remove lower leaves, leaving 1–2 at the top.
- Optionally dip the cut end in rooting hormone.
Softwood cuttings root faster but require more humidity control.
Step 3: Prepare the Growing Medium
Drainage is critical.
Use a mix such as:
- 50% perlite + 50% peat moss
- Sand + compost blend
- Seed-starting mix
Avoid heavy garden soil—it can cause rot.
Moisten the medium before inserting cuttings.
Step 4: Plant the Cuttings
Insert the cutting so that:
- At least two nodes are buried
- One or two nodes remain above soil
Firm the soil gently around the base.
For hardwood cuttings, you can plant them directly outdoors in a prepared bed in late winter. For softwood cuttings, containers are easier to manage.
Step 5: Provide the Right Conditions
Light
Bright, indirect light works best. Avoid harsh direct sun for fresh cuttings.
Moisture
Keep soil consistently moist—not soggy.
Humidity (for softwood)
Use a humidity dome or loosely cover with a clear plastic bag to maintain moisture.
Temperature
Ideal rooting temperatures are 65–75°F (18–24°C).
Roots typically form in:
- 4–8 weeks for softwood cuttings
- 8–12 weeks for hardwood cuttings
Be patient—root growth happens underground first.
How to Know If It’s Rooted
Gently tug on the cutting after several weeks. If you feel resistance, roots have formed.
New leaf growth is also a positive sign.
Avoid pulling too often—disturbing new roots can slow development.
Transplanting Your New Berry Bush
Once roots are well-developed:
- Harden off indoor-grown cuttings by gradually exposing them to outdoor conditions.
- Choose a sunny planting location.
- Improve soil with compost.
- Plant at the same depth as in the container.
- Water thoroughly.
Most berry bushes prefer full sun and well-drained soil.
Special Notes for Popular Berries
Raspberries
Red raspberries like Rubus idaeus are among the easiest to propagate. They also spread naturally via suckers.
Blackberries
Rubus fruticosus varieties root readily from both stem cuttings and tip layering (burying the tip of a cane until it roots).
Blackcurrants
Ribes nigrum is highly successful from hardwood cuttings planted directly in soil during dormancy.
Blueberries
Vaccinium corymbosum prefers acidic soil (pH 4.5–5.5). Ensure proper soil conditions after rooting.
Common Mistakes to Avoid
Overwatering
Soggy soil causes rot. Keep moist, not drenched.
Taking Weak Cuttings
Thin or diseased stems root poorly.
Ignoring Season
Timing matters—hardwood in winter, softwood in spring.
Planting Upside Down
Always mark the bottom of hardwood cuttings if unsure.
Can You Root Berry Cuttings in Water?
Some gardeners try rooting in water. While raspberries and blackberries may produce water roots, soil rooting produces stronger, more transplant-ready root systems.
Water roots are fragile and may struggle when moved to soil.
For best long-term success, root directly in a soil mix.
How Long Until You Get Fruit?
Patience pays off.
- Raspberries may produce fruit in 1–2 years.
- Blackberries often fruit the second year.
- Blueberries may take 2–3 years for full production.
- Currants can produce within 1–2 seasons.
The timeline depends on species and growing conditions.
Why This Method Is So Reliable
Berry bushes naturally propagate themselves in the wild. Many species evolved to spread through stem contact with soil.
By taking cuttings, you’re simply assisting a natural process.
This is why success rates are often high—even for beginners.
Expanding Your Berry Patch for Free
Imagine starting with one healthy bush and turning it into:
- A backyard berry hedge
- A productive row along a fence
- Extra plants to share with friends
- A small homestead fruit supply
All without buying additional plants.
Propagation turns one investment into many.
Final Thoughts
Starting berry bushes from cuttings isn’t complicated. It doesn’t require expensive equipment or advanced gardening skills.
All you need is:
- A healthy parent plant
- The right cutting at the right time
- A well-draining growing medium
- Consistent moisture and patience
Whether you’re multiplying raspberries, blueberries, currants, or blackberries, the process is simple, natural, and highly rewarding.