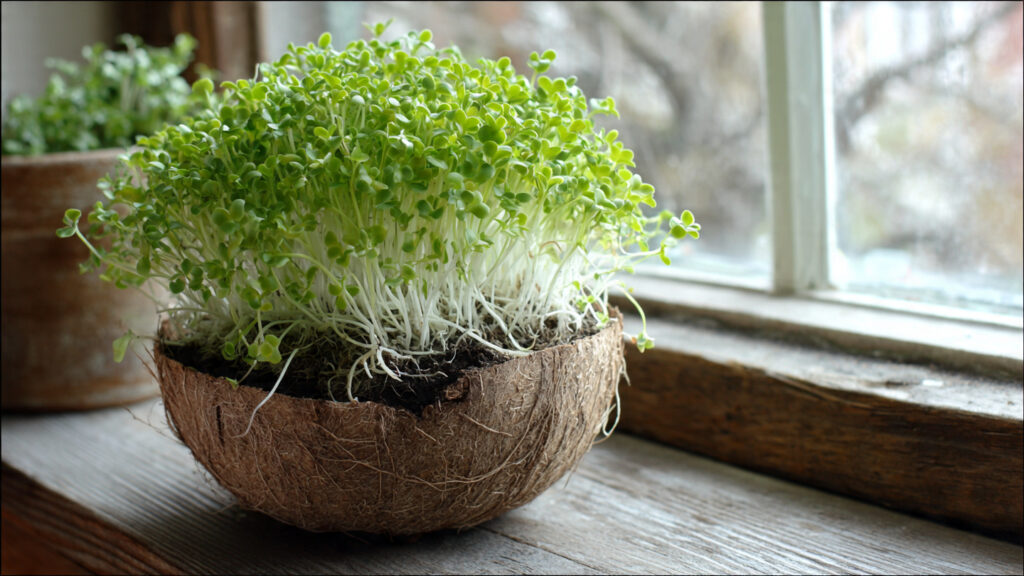
Microgreens have taken the culinary and health world by storm. These tiny, nutrient-packed greens are not only flavorful but also incredibly easy to grow at home. Traditionally, microgreens are grown in soil or hydroponic setups, but did you know that coconut-based growing mediums offer an easier, eco-friendly, and highly efficient alternative? Using coconut coir or husk, you can grow lush, healthy microgreens without soil, making the process cleaner, faster, and perfect for indoor gardening.
This guide will walk you through why coconut is ideal for microgreens, how to grow them step by step, and tips for maximum yield, ensuring you enjoy fresh, homegrown greens effortlessly.
Why Grow Microgreens in Coconut?
Coconut-based mediums, such as coconut coir or husk, are excellent for growing microgreens for several reasons:
- No soil required – Eliminates mess, pests, and the need for garden soil.
- Eco-friendly – Coconut coir is a sustainable byproduct of coconut processing.
- Retains moisture efficiently – Ensures seeds remain hydrated without waterlogging.
- Provides good aeration – Roots receive sufficient oxygen for rapid growth.
- Clean and reusable – Easy to rinse and reuse for multiple microgreen cycles.
Coconut coir also helps maintain ideal pH and nutrient balance, which is essential for microgreens’ fast growth.
Nutritional Benefits of Microgreens
Microgreens may be small, but they are nutrient powerhouses. Compared to mature vegetables, microgreens often contain:
- Higher concentrations of vitamins – Vitamins A, C, and K.
- Rich in antioxidants – Supports immune function and overall health.
- Essential minerals – Includes iron, calcium, magnesium, and potassium.
- Phytochemicals – Helps fight inflammation and oxidative stress.
By growing microgreens at home using coconut, you ensure fresh, chemical-free, highly nutritious greens at your fingertips.
Choosing Seeds for Coconut Microgreens
Almost any microgreen seed can thrive in coconut coir. Popular options include:
- Broccoli microgreens – Mild, crunchy, and full of nutrients.
- Radish microgreens – Peppery flavor with fast germination.
- Sunflower microgreens – Nutty taste and sturdy stems.
- Pea shoots – Sweet, tender, and packed with vitamins.
- Basil or cilantro – Adds a flavorful herb punch to salads or dishes.
Choose high-quality, non-GMO seeds for the best growth and flavor.
Preparing Coconut Coir for Microgreens
Coconut coir is sold in compressed bricks, loose coir, or mats. Here’s how to prepare it:
- Soak coir – Place in water and allow it to expand for 15–30 minutes.
- Drain excess water – Ensure it’s moist but not dripping.
- Fluff the coir – Break up clumps to create a light, airy medium for seed roots.
- Fill trays or containers – Spread a 1–2 inch layer evenly.
Proper preparation ensures even seed contact and optimal moisture retention, which is crucial for germination.
Step-by-Step Guide to Growing Microgreens in Coconut
1. Select Your Container
- Use shallow trays with drainage holes for indoor growth.
- Recycled food trays, seedling flats, or small planters work well.
2. Fill with Prepared Coconut Coir
- Spread evenly, pressing lightly to create a smooth surface.
- Moisten lightly to maintain uniform hydration.
3. Sow Seeds Evenly
- Scatter seeds generously but avoid overcrowding.
- Cover lightly with a thin layer of coir or leave exposed, depending on the seed type.
4. Water Gently
- Use a spray bottle to mist the surface without displacing seeds.
- Keep coir consistently moist for rapid germination.
5. Provide Light
- Place trays in a bright, indirect light area.
- Alternatively, use LED grow lights for indoor setups.
6. Monitor Growth
- Most microgreens germinate in 2–7 days, depending on the variety.
- Continue misting daily to maintain moisture without overwatering.
7. Harvest at Peak
- Microgreens are usually ready 7–14 days after germination, once leaves are fully formed.
- Use scissors to cut just above the coir layer.
With these steps, you can enjoy a continuous harvest of vibrant, healthy microgreens in just a few weeks.
Advantages of Using Coconut Coir Over Soil
Growing microgreens in coconut offers several practical benefits:
- Cleaner process – No soil mess indoors.
- Faster growth – Excellent water retention encourages rapid germination.
- Reduces pests – Coconut coir is less likely to attract insects or soil-borne pathogens.
- Reusable medium – Rinse and refresh for multiple cycles.
- Portable and lightweight – Ideal for indoor gardening or small apartments.
These benefits make coconut microgreens a perfect solution for urban or indoor growers.
Troubleshooting Common Issues
Even with coconut, microgreens can face minor challenges:
- Mold growth – Often caused by overwatering or poor airflow. Use a fan or space trays apart.
- Uneven growth – Ensure seeds are spread evenly and light reaches all areas.
- Slow germination – Check seed quality and ensure coir is adequately moist.
- Yellowing leaves – Avoid excess water or insufficient light.
Addressing these issues ensures healthy, high-yield microgreens every cycle.
➡️ How to Grow Malabar Spinach from Cuttings for Fast, Easy Greens
➡️ How to Grow Super Delicious Cabbage at Home Without a Garden
➡️ How to Grow Bean Sprouts at Home in Plastic Bottles Easily (Step‑by‑Step Guide)
➡️ Why is Your Lemon Tree Blooming in the Heart of Winter?
➡️ Why Should Your Garden Have a Dedicated Pollinator Highway?
➡️ Why Do Your Fruit Trees Need a Winter Wash to Thrive in Spring?
➡️ How Can Rice Water Transform Your Fruits into Sweeter Delights?
➡️ Jumpstart Your Winter Garden: Seed Starting Under Lights
Tips for Maximum Yield
- Rotate trays – Ensures even light exposure.
- Use nutrient mist – Diluted liquid fertilizer after germination can boost growth.
- Keep humidity moderate – Too much moisture can promote mold; too little can dry seedlings.
- Harvest promptly – Delayed harvesting can reduce tenderness and flavor.
- Experiment with blends – Mix varieties for color, flavor, and nutrient diversity.
Following these tips helps you maximize growth, flavor, and nutrient content from every tray.
Creative Ways to Enjoy Coconut-Grown Microgreens
Microgreens are versatile and delicious. Try these ideas:
- Salads – Add fresh, crunchy greens to any salad for flavor and nutrition.
- Smoothies – Blend microgreens into smoothies for a vitamin boost.
- Garnishes – Top soups, sandwiches, or avocado toast with vibrant greens.
- Stir-fries – Quickly sauté for a nutrient-packed side dish.
- Juicing – Combine with fruits and vegetables for fresh, healthy juice.
Growing microgreens with coconut coir ensures fresh, chemical-free additions to your meals year-round.
Eco-Friendly and Sustainable Gardening
Using coconut as a growing medium promotes sustainability:
- Reuses byproducts – Coconut husks and coir are renewable and biodegradable.
- Reduces soil dependency – Less need for traditional soil, which can be environmentally taxing.
- Supports indoor gardening – Minimal water and space requirements make it eco-conscious.
By choosing coconut for microgreens, you are embracing green, sustainable gardening practices while enjoying healthy food.
Conclusion
Growing microgreens doesn’t have to be complicated or messy. With coconut coir, you can bypass soil entirely and enjoy a clean, fast-growing, and nutrient-rich harvest right at home. From selecting seeds and preparing coconut coir to planting, watering, and harvesting, this method is perfect for beginners and seasoned growers alike.
By following these steps and tips, you can enjoy lush, vibrant microgreens year-round, packed with flavor and nutrition, while embracing an eco-friendly gardening approach. No soil, no problem—coconut makes it super easy to grow your own fresh greens, turning any small space into a thriving indoor garden.