Tomatoes are a staple in kitchens worldwide, whether in fresh salads, sauces, or cooked dishes. Starting your tomato plants from seed is not only rewarding but also allows you to select the exact varieties you want, whether juicy heirlooms, cherry tomatoes, or robust beefsteak types. While germinating tomato seeds may seem daunting to beginners, with the right guidance and techniques, anyone can successfully grow healthy seedlings ready to flourish into productive plants. This complete beginner’s guide will walk you step by step from seed to sprout, ensuring your tomato-growing journey begins with confidence.
Why Start Tomatoes from Seeds?
Many gardeners wonder why they shouldn’t just buy seedlings. Growing from seeds offers several advantages:
- Variety Selection: Seeds give access to rare or heirloom varieties not commonly sold as seedlings.
- Cost-Effective: A small packet of seeds can produce dozens of plants at a fraction of the cost of buying seedlings.
- Control Over Growth: You can manage soil quality, watering, and disease prevention from the very beginning.
- Satisfaction: Watching a tiny seed transform into a thriving plant is deeply rewarding for beginner and experienced gardeners alike.
Choosing the Right Tomato Seeds
The first step in successful germination is selecting high-quality seeds.
- Heirloom vs. Hybrid: Heirloom seeds produce true-to-type fruits and offer unique flavors, while hybrids often yield higher productivity and disease resistance.
- Seed freshness: Tomato seeds are viable for up to 5 years when stored in a cool, dry place. Using fresh seeds ensures faster and more uniform germination.
- Variety purpose: Decide if you want small cherry tomatoes for snacking, plum varieties for sauces, or large beefsteaks for sandwiches. Choose seeds accordingly.
Preparing for Germination
Before planting, preparation is key. Here’s what you need:
- Containers: Small seed trays, pots, or even egg cartons work well. Ensure they have drainage holes.
- Seed-starting mix: Use a light, well-draining mix specifically formulated for seedlings. Avoid garden soil, which may be too dense or harbor pathogens.
- Labels: Mark each container with the seed variety and date sown to track growth.
- Light and warmth: Tomato seeds germinate best in warm conditions (70–80°F). A sunny windowsill or a seedling heat mat works perfectly.
Step-by-Step Guide to Germinating Tomato Seeds
Step 1: Soak the Seeds (Optional but Helpful)
Soaking seeds in lukewarm water for 12–24 hours can speed up germination. It softens the seed coat and allows moisture to penetrate more easily. Be careful not to soak them too long, as prolonged exposure can cause seeds to rot.
Step 2: Fill Containers with Seed-Starting Mix
Fill your trays or pots with moist (not soggy) seed-starting mix. Lightly pat down the soil but don’t compress it. Loose soil allows roots to penetrate easily.
Step 3: Plant the Seeds
- Sow seeds about ¼ inch deep in the soil.
- Plant 2–3 seeds per cell or pot to ensure at least one germinates successfully.
- Cover lightly with soil and gently water.
Step 4: Provide Warmth and Moisture
Tomato seeds need consistent moisture and warmth to germinate. Covering trays with a clear plastic lid or plastic wrap helps retain humidity. Place the containers in a warm location with indirect sunlight.
Step 5: Monitor and Maintain
Check daily to ensure the soil remains damp but not waterlogged. Use a spray bottle for gentle misting. Remove the cover once seeds start sprouting to prevent mold growth.
Understanding Germination Timelines
Tomato seeds typically germinate within 5–14 days. Factors affecting germination include:
- Temperature: Seeds germinate faster at 75–80°F.
- Moisture: Soil that dries out will slow or stop germination.
- Seed quality: Fresh, healthy seeds germinate more uniformly than old or damaged seeds.
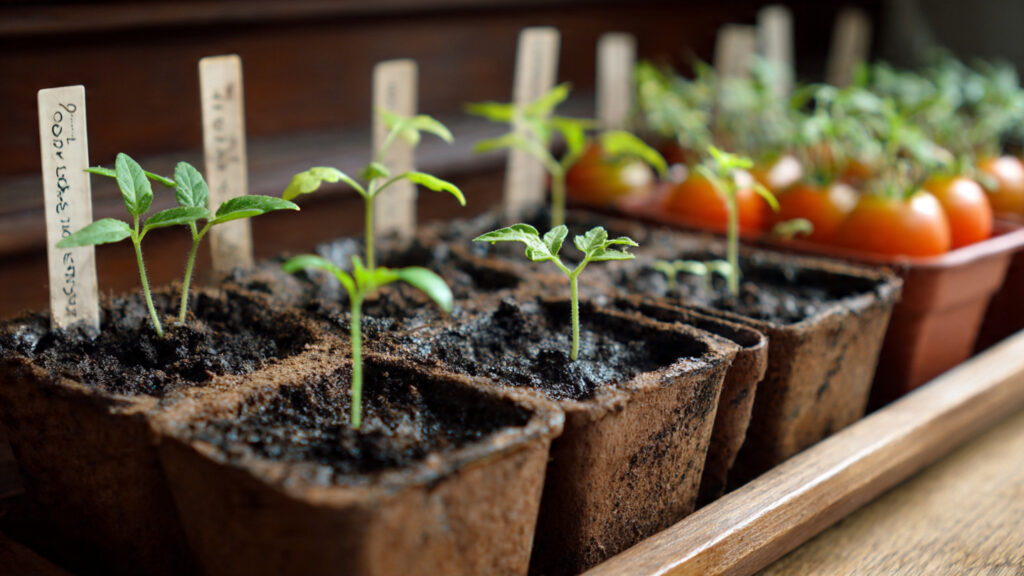
Caring for Seedlings After Sprouting
Once your tomato seeds sprout, your focus shifts to nurturing healthy seedlings:
1. Light
Seedlings need 12–16 hours of light daily. If natural sunlight is insufficient, consider using fluorescent or LED grow lights. Keep the lights 2–3 inches above the seedlings and adjust as they grow.
2. Watering
Keep the soil consistently moist, but avoid overwatering, which can lead to damping-off disease—a fungal infection that kills young seedlings.
3. Thinning
When seedlings develop their first true leaves, thin them to one per cell by snipping weaker seedlings at the base. This ensures strong, healthy plants.
4. Air Circulation
Good airflow prevents fungal diseases. Use a small fan on a gentle setting or periodically remove the seedlings from the tray cover to allow air movement.
5. Fertilization
After seedlings develop their first true leaves, feed them with a diluted liquid fertilizer rich in nitrogen to support leafy growth. Avoid over-fertilizing, which can weaken stems.
➡️ How to Grow Malabar Spinach from Cuttings for Fast, Easy Greens
➡️ How to Grow Super Delicious Cabbage at Home Without a Garden
➡️ How to Grow Bean Sprouts at Home in Plastic Bottles Easily (Step‑by‑Step Guide)
➡️ Why is Your Lemon Tree Blooming in the Heart of Winter?
➡️ Why Should Your Garden Have a Dedicated Pollinator Highway?
➡️ Why Do Your Fruit Trees Need a Winter Wash to Thrive in Spring?
➡️ How Can Rice Water Transform Your Fruits into Sweeter Delights?
➡️ Jumpstart Your Winter Garden: Seed Starting Under Lights
Preparing Seedlings for Transplanting
Before moving seedlings outdoors or into larger containers, harden them off:
- Timing: Begin 1–2 weeks before transplanting.
- Gradual exposure: Start by placing seedlings outdoors for a few hours in indirect sunlight. Increase exposure to sunlight and wind gradually each day.
- Watering adjustment: Reduce watering slightly to help seedlings adapt to outdoor conditions.
Hardening off helps seedlings adjust to changes in light, temperature, and wind, reducing transplant shock.
Common Challenges and How to Overcome Them
Even with careful attention, beginners may face some common issues:
- Mold or fungus: Ensure proper drainage, avoid overwatering, and provide good airflow.
- Leggy seedlings: Insufficient light causes stems to stretch. Move seedlings closer to light or use supplemental grow lights.
- Poor germination: Check seed viability, soil moisture, and temperature. Soaking or pre-germinating seeds on a damp paper towel can help.
Tips for Success and Maximum Yield
- Start early: Begin seeds indoors 6–8 weeks before your last frost date.
- Label everything: Keep track of varieties, sowing dates, and germination times.
- Record observations: Note which methods worked best for your environment for future crops.
- Be patient: Germination may take longer in cooler or drier conditions. Consistency is key.
Beyond Germination: Growing Healthy Tomatoes
Successful germination is just the start. Healthy seedlings lead to strong plants and abundant harvests. After transplanting, continue to provide:
- Full sun (6–8 hours daily)
- Support structures like cages or stakes
- Consistent watering and mulching to retain soil moisture
- Regular pruning to encourage airflow and fruit production
By starting with healthy seedlings, you set the stage for months of flavorful, homegrown tomatoes.
Conclusion
Germinating tomato seeds may seem intimidating at first, but with the right steps, anyone can do it. By choosing quality seeds, preparing containers and soil, and providing warmth, light, and care, you can nurture tiny seeds into healthy seedlings ready for transplanting. This beginner’s guide offers a roadmap from seed to sprout, ensuring that your tomato-growing adventure begins on the right foot.
Whether you’re a city dweller with limited space or an aspiring gardener looking for a rewarding project, starting tomatoes from seeds is a cost-effective, enjoyable, and sustainable way to enjoy fresh, homegrown produce. Watch your seeds sprout, your seedlings thrive, and soon you’ll be harvesting juicy, flavorful tomatoes straight from your garden—a true reward for patience, care, and a little gardening know-how.