Thyme (Thymus vulgaris) is a versatile and fragrant herb that belongs in every home garden or kitchen. Its aromatic leaves enhance countless dishes, from roasted vegetables to soups and stews, while its small purple or pink flowers attract pollinators to your garden. While thyme is relatively easy to grow from seeds or established plants, propagating it from cuttings using the water method is one of the simplest and most effective ways for beginners to multiply their plants quickly and effortlessly.
Unlike soil propagation, which can be tricky for some herb beginners due to overwatering or fungal problems, rooting thyme in water is straightforward, fast, and visually satisfying. Watching tiny roots emerge from cuttings provides instant feedback and assurance that your plant is thriving. This guide will walk you through a step-by-step approach to rooting thyme cuttings using the water method, ensuring strong, healthy plants ready for transplanting into soil or containers.
Why Propagate Thyme from Cuttings?
Propagation from cuttings has multiple advantages over starting from seeds:
- Faster Establishment: Seedlings take weeks to germinate, while cuttings root in a matter of days or weeks.
- Genetic Consistency: Cuttings are clones of the parent plant, preserving flavor, aroma, and growth habit.
- Cost-Effective: Multiply existing plants without purchasing new ones.
- Beginner-Friendly: Minimal tools and materials are required.
Using the water method also provides the ability to monitor root growth visually, reducing the risk of failure and giving beginners confidence.
Step 1: Select a Healthy Parent Plant
Successful propagation starts with a robust thyme plant. Look for:
- Vibrant green leaves
- Strong, flexible stems (not woody or brittle)
- No signs of disease, pests, or discoloration
Avoid cuttings from stressed or flowering stems. Flowering stems may redirect energy away from root development, slowing propagation.
Step 2: Choose the Right Cuttings
Softwood cuttings are best for water propagation. These are tender, young shoots from the current season’s growth.
Guidelines for selecting cuttings:
- Length: 3–5 inches
- Diameter: About the thickness of a pencil
- No flowers or buds
- Healthy leaves along the stem
Using the right cutting ensures a higher success rate and faster root development.
Step 3: Prepare the Cuttings
Proper preparation maximizes rooting potential:
- Trim the Stem: Cut just below a leaf node. This node will produce roots.
- Remove Lower Leaves: Strip the bottom 1–2 inches of leaves to prevent them from rotting in water. Leave a few healthy leaves at the top to continue photosynthesis.
- Optional Rooting Hormone: Dipping the cut end in rooting hormone is optional but can accelerate root formation.
Ensure clean, sharp scissors or pruning shears are used to make a neat cut, reducing tissue damage and preventing infection.
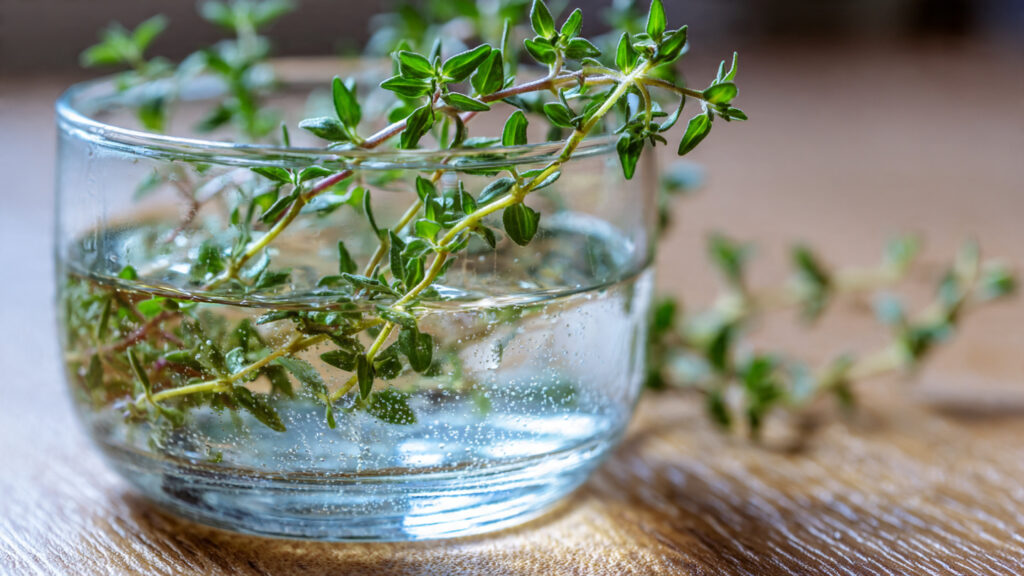
Step 4: Prepare a Water Container
Use a small, clean glass or jar filled with fresh, room-temperature water.
Tips for success:
- Avoid opaque containers; clear glass allows you to monitor root growth.
- Use filtered water if possible; tap water with high chlorine levels may hinder rooting.
- Fill the container so the stripped portion of the stem is submerged while leaves remain above water.
Maintaining cleanliness is crucial to prevent bacterial or fungal growth, which can compromise the cutting.
Step 5: Place Cuttings in Water
- Insert the prepared cuttings into the jar, ensuring the stripped portion of the stem is fully submerged.
- Arrange multiple cuttings without overcrowding; they need space to avoid tangling or rot.
- Place the jar in a warm, bright spot with indirect sunlight. Avoid direct sun, which may overheat the cuttings.
Water temperature and light exposure significantly affect rooting speed and success.
➡️ How to Grow Malabar Spinach from Cuttings for Fast, Easy Greens
➡️ How to Grow Super Delicious Cabbage at Home Without a Garden
➡️ How to Grow Bean Sprouts at Home in Plastic Bottles Easily (Step‑by‑Step Guide)
➡️ Why is Your Lemon Tree Blooming in the Heart of Winter?
➡️ Why Should Your Garden Have a Dedicated Pollinator Highway?
➡️ Why Do Your Fruit Trees Need a Winter Wash to Thrive in Spring?
➡️ How Can Rice Water Transform Your Fruits into Sweeter Delights?
➡️ Jumpstart Your Winter Garden: Seed Starting Under Lights
Step 6: Maintain Water Conditions
Rooting thyme in water requires consistent care:
- Change Water Regularly: Replace water every 2–3 days to prevent stagnation and bacterial growth.
- Keep Water Level Consistent: Ensure submerged stem sections remain underwater at all times.
- Temperature: Maintain a stable room temperature of 65–75°F (18–24°C) for optimal growth.
These steps create a healthy environment for roots to develop without stress or disease.
Step 7: Monitor Root Development
Thyme cuttings typically produce roots in 1–3 weeks, depending on environmental conditions. Look for:
- Small white roots emerging from nodes
- Healthy green leaves at the top
- A slight increase in stem rigidity
Avoid disturbing cuttings prematurely, as fragile roots are easily damaged. Once roots reach approximately 1–2 inches, the cuttings are ready for transplanting.
Step 8: Transplanting Rooted Thyme Cuttings
Once roots are well-established, it’s time to move your cuttings into soil or containers:
- Prepare Soil: Use a well-draining potting mix, ideally with equal parts peat moss, perlite, and garden soil. Thyme thrives in slightly sandy, loamy soil with a neutral to slightly alkaline pH (6–8).
- Pot or Garden Bed: Choose a pot with drainage holes or a sunny garden spot with good air circulation.
- Planting Depth: Dig a small hole and place the rooted cutting so the roots are fully covered while the base of the stem is just above soil level.
- Watering: Water gently but thoroughly to help soil settle around the roots.
Provide partial shade for a few days to allow the plant to acclimate before exposing it to full sun.
Step 9: Care After Transplanting
Proper care ensures the newly rooted cuttings thrive:
- Watering: Keep soil moist but not waterlogged for the first 1–2 weeks. Once established, thyme tolerates moderate drought.
- Sunlight: Provide 6–8 hours of full sun for optimal growth and flavor.
- Fertilization: Use a balanced, low-nitrogen fertilizer sparingly. Too much nitrogen encourages leaf growth but reduces essential oils and flavor.
- Pruning: Trim lightly to encourage bushier growth and prevent legginess.
Gradually, your thyme cuttings will establish a strong root system and grow into mature, productive plants.
Step 10: Troubleshooting Common Problems
Even with the water method, beginners may face challenges. Here are common issues and solutions:
1. Cutting Rotting in Water
- Cause: Overcrowding, stagnant water, or decaying leaves
- Solution: Remove decayed parts, change water regularly, and ensure leaves do not touch water
2. No Root Formation
- Cause: Cold temperature, weak cutting, or insufficient light
- Solution: Move jar to a warmer location with bright, indirect light, and use healthy softwood cuttings
3. Weak or Yellowing Leaves
- Cause: Poor water quality or inadequate nutrients
- Solution: Use fresh, filtered water and transplant to nutrient-rich soil as soon as roots develop
Step 11: Advantages of the Water Propagation Method
- Visibility: Watch roots grow, providing immediate feedback.
- Success Rate: Higher for beginners compared to soil propagation.
- Minimal Resources: Requires only water, container, and cuttings.
- Reduced Risk of Disease: Less risk of fungal problems compared to moist soil propagation.
This method is perfect for beginners who want a simple, effective way to multiply thyme without complex equipment.
Step 12: Expanding Your Thyme Garden
Once your cuttings establish in soil, you can:
- Grow Indoors or Outdoors: Depending on climate, plant in containers or garden beds.
- Create a Herb Patch: Combine thyme with rosemary, oregano, and sage for a productive herb garden.
- Share Plants: Root multiple cuttings and give them to friends and family.
- Harvest Regularly: Trim leaves for cooking, which encourages fuller growth and prevents legginess.
Propagation ensures a sustainable, cost-effective supply of thyme year-round.
Step 13: Seasonal Considerations
Thyme is hardy but responds to seasonal adjustments:
- Spring and Summer: Best time for water propagation and transplanting.
- Autumn: Cuttings can still root, but growth may slow due to reduced light and temperature.
- Winter: Protect young plants from frost or grow indoors in bright, sunny locations.
By timing propagation and transplantation appropriately, your thyme will thrive in any season.
Step 14: The Satisfaction of Growing Thyme from Cuttings
Rooting thyme cuttings using the water method offers several rewards:
- Visual Progress: Watching roots emerge is satisfying and educational.
- Rapid Growth: Cuttings quickly become established plants.
- Flavorful Herbs: Freshly propagated thyme retains the same aroma and taste as the parent.
- Gardening Confidence: Easy success builds confidence for beginners expanding to other herbs.
Final Thoughts
Propagating thyme from softwood cuttings using the water method is a simple, effective, and beginner-friendly way to grow this aromatic herb. With minimal tools and a little patience, anyone can multiply their thyme plants and enjoy fresh, flavorful leaves year-round.
Remember the key steps:
- Select a healthy parent plant.
- Take softwood cuttings from young, flexible shoots.
- Remove lower leaves and optionally use rooting hormone.
- Place cuttings in clean, fresh water in a bright, warm location.
- Maintain water quality and monitor root growth.
- Transplant rooted cuttings into well-draining soil.
- Provide sunlight, proper watering, and light fertilization to ensure thriving plants.
By following this guide, beginners can successfully root thyme cuttings, enjoy the satisfaction of nurturing new plants, and build a flourishing, aromatic herb garden for cooking, teas, and ornamental use.