Avocado (Persea americana) has become one of the most popular fruits in home kitchens, prized for its creamy texture, healthy fats, and versatility in dishes. But beyond enjoying the delicious fruit, many gardeners are intrigued by the challenge of growing avocado trees from seed. Germinating avocado seeds indoors is a rewarding project, even for beginners, and can result in a beautiful houseplant or eventually a fruit-bearing tree. With simple techniques, minimal equipment, and patience, you can successfully start an avocado seed indoors and watch it develop into a thriving plant. This ultimate guide will walk you step by step through the process, from seed preparation to initial growth.
Understanding Avocado Seeds
Avocado seeds are large, round, and smooth, typically found at the center of the fruit. Each seed contains the potential to grow into a full avocado tree. However, germinating seeds requires attention to detail and proper care:
- Seed Viability: Not all avocado seeds will germinate, especially if the fruit was overripe or stored improperly. Fresh seeds from healthy fruit yield the best results.
- Timeframe: Avocado seeds can take 2–8 weeks to sprout, depending on the method and environmental conditions.
- Seed Structure: The seed has a pointed end (top) and a flatter base (bottom). Correct orientation is essential for successful germination.
Understanding these basics helps ensure you start with the highest chance of success.
Step 1: Selecting a Healthy Avocado Seed
The first step is choosing the right seed for germination:
- Fresh Fruit: Use seeds from ripe, but not overripe, avocados. Overripe fruit may have compromised seeds.
- Size and Integrity: Select a seed that is large, firm, and free of cracks, mold, or blemishes.
- Cleanliness: Wash the seed thoroughly to remove all fruit residue, which can harbor bacteria or fungi.
Fresh, healthy seeds are the foundation of successful indoor germination.
Step 2: Preparing the Seed
Before germination, avocado seeds need careful preparation:
- Remove the Seed Coat: Some gardeners gently peel the thin brown skin, although leaving it on is also acceptable. Peeling may speed up germination slightly.
- Identify the Top and Bottom: The pointed end is the top, where the shoot emerges, and the flat base is the bottom, where roots develop.
- Soaking: Soak the seed in lukewarm water for 24–48 hours to rehydrate it, especially if it has been stored for a few days.
Proper preparation ensures the seed is ready to sprout and reduces the risk of mold or rot.
Step 3: Choosing a Germination Method
There are two popular methods for germinating avocado seeds indoors: the water method and the soil method. Both are beginner-friendly and effective.
A. Water Method
This classic method allows you to watch the seed sprout:
- Insert 3–4 toothpicks around the middle of the seed.
- Suspend the seed in a glass or jar of water, flat side down, so the bottom is submerged.
- Place the container in a warm, bright location, but out of direct sunlight.
- Change the water every 3–5 days to prevent stagnation and bacterial growth.
Within 2–8 weeks, the seed should crack, roots will grow downward, and a sprout will emerge from the top.
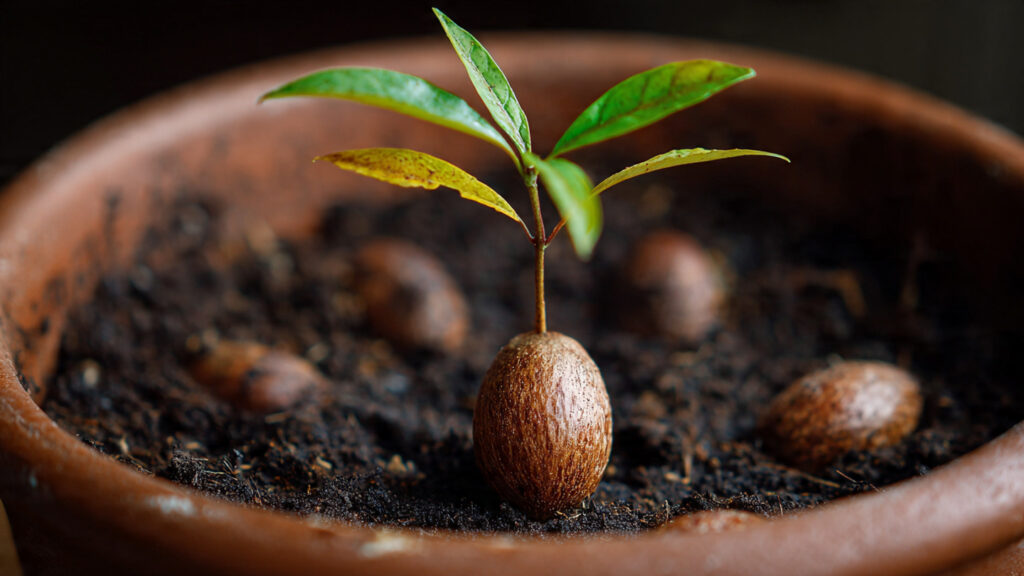
B. Soil Method
For a more natural approach, planting directly in soil works well:
- Fill a small pot (4–6 inches) with well-draining potting soil.
- Plant the seed with the bottom ½–⅔ submerged in soil, leaving the top slightly exposed.
- Water lightly to keep the soil moist but not soggy.
- Cover the pot loosely with plastic wrap or a clear dome to maintain humidity.
This method takes slightly longer but reduces the risk of root disturbance when transplanting.
Step 4: Providing the Right Conditions
Avocado seeds germinate best under specific conditions:
- Temperature: Keep seeds in a warm area, ideally between 65–85°F (18–29°C). Avoid cold drafts.
- Light: Indirect bright light encourages healthy sprout growth. Avoid direct sun during early germination, which can overheat the seed.
- Humidity: High humidity accelerates sprouting. Covering soil or using a greenhouse dome works well.
- Air Circulation: Ensure slight airflow to prevent mold, especially with the soil method.
Maintaining stable, warm, and humid conditions maximizes germination success.
Step 5: Monitoring for Germination
Germination can take patience. Look for the following signs:
➡️ How to Grow Malabar Spinach from Cuttings for Fast, Easy Greens
➡️ How to Grow Super Delicious Cabbage at Home Without a Garden
➡️ How to Grow Bean Sprouts at Home in Plastic Bottles Easily (Step‑by‑Step Guide)
➡️ Why is Your Lemon Tree Blooming in the Heart of Winter?
➡️ Why Should Your Garden Have a Dedicated Pollinator Highway?
➡️ Why Do Your Fruit Trees Need a Winter Wash to Thrive in Spring?
➡️ How Can Rice Water Transform Your Fruits into Sweeter Delights?
➡️ Jumpstart Your Winter Garden: Seed Starting Under Lights
- Cracks in the Seed: Indicates the seed is actively growing.
- Root Emergence: A white, fibrous root growing downward is the first visible sign of success.
- Sprout Formation: A green shoot emerges from the top, eventually forming leaves.
It’s normal for germination to vary widely in time. Some seeds sprout quickly, while others take several weeks. Patience is key.
Step 6: Transplanting Sprouted Seeds
Once the seed has a strong root system and a sprout 3–6 inches tall, it’s time to transplant:
- Select a 6–8 inch pot with good drainage holes.
- Use well-draining potting soil mixed with sand or perlite to avoid waterlogging.
- Plant the seed at the same depth as it was during germination, with the top sprout above soil level.
- Water lightly to help the plant adjust to its new home.
Proper transplanting ensures healthy continued growth and prevents root shock.
Step 7: Caring for Young Avocado Plants
After transplanting, your avocado seedling needs proper care to thrive:
- Watering: Keep the soil consistently moist but not soggy. Overwatering can cause root rot.
- Light: Provide bright, indirect sunlight. Rotate the pot occasionally for even growth.
- Temperature: Maintain a warm environment and avoid cold drafts.
- Fertilization: Begin light feeding after 4–6 weeks with a balanced, diluted fertilizer to support healthy leaf and root development.
Good care during this stage ensures a strong, healthy young plant that will continue to grow vigorously indoors.
Step 8: Encouraging Healthy Growth
To help your indoor avocado seedling flourish:
- Pinching Tips: Once the plant reaches 6–8 inches, pinch off the top to encourage bushier growth.
- Support: Use small stakes if stems grow tall and spindly.
- Pruning: Remove any damaged or yellow leaves to maintain plant health.
These techniques prevent legginess and promote a fuller, sturdier indoor avocado plant.
Step 9: Long-Term Indoor Care
Indoor avocado plants can thrive for years with proper care:
- Pot Size: Upgrade pots as the plant grows to accommodate root expansion.
- Repotting: Repot every 1–2 years with fresh potting soil.
- Light: Provide 6–8 hours of bright indirect light daily. Grow lights can supplement during winter months.
- Fertilization: Feed monthly with a balanced, water-soluble fertilizer during the growing season.
While it may take years for an indoor avocado to produce fruit, the plant remains an attractive, leafy houseplant with ornamental value.
Step 10: Troubleshooting Common Issues
Even with careful attention, beginners may encounter challenges:
- Seed Rot: Caused by standing water. Ensure proper drainage and avoid overwatering.
- Slow Germination: Seeds may take longer in cooler conditions or if not fresh. Be patient.
- Leggy Seedlings: Insufficient light can cause tall, weak sprouts. Supplement with grow lights or reposition near a bright window.
- Yellow Leaves: Often due to overwatering or nutrient deficiencies. Adjust care accordingly.
By monitoring conditions and addressing issues early, most problems can be corrected without harming the plant.
Step 11: Fun Tips for Beginners
- Label containers with the date of planting to track germination progress.
- Try multiple seeds at once to increase your chances of successful sprouting.
- Rotate pots regularly to encourage symmetrical growth.
- Keep a journal of your plant’s growth, watering, and fertilization to learn what works best for your environment.
These small practices improve success rates and make the process more enjoyable.
Conclusion
Germinating avocado seeds indoors is a rewarding and educational project for beginners. With careful seed selection, proper preparation, the right germination method, and attentive care, even first-time gardeners can successfully start an avocado plant at home. Whether using the classic water method or planting directly in soil, understanding seed orientation, maintaining warmth, light, and moisture, and practicing patience are key to success.
Once sprouted and transplanted, indoor avocado plants thrive as attractive houseplants, providing lush greenery and a sense of accomplishment. With continued care, including proper watering, fertilization, and pruning, your plant can grow strong and healthy, bringing the satisfaction of cultivating a tree from seed.
Even if indoor conditions do not allow fruiting, growing avocado from seed offers a unique gardening experience, adds beauty to your home, and teaches valuable lessons in plant care and patience. By following this ultimate guide, beginners can confidently embark on their indoor avocado-growing journey and enjoy the excitement of nurturing a seed into a thriving plant.