If you’ve ever looked at a stack of old wooden pallets and wondered what you could do with them, you’re not alone. Pallets are everywhere—discarded by warehouses, shipping companies, and even local stores. Yet, with a bit of creativity, these humble pieces of wood can be transformed into something truly functional and beautiful: a designer potting bench. Perfect for gardeners, crafters, or anyone who loves a practical DIY project, a pallet potting bench combines sustainability, style, and utility. Here’s how you can turn those old pallets into a stunning addition to your garden or workspace.
1. Why Choose Wooden Pallets for a Potting Bench?
Before we dive into the transformation process, it’s important to understand why wooden pallets are a great choice:
- Eco-Friendly and Budget-Friendly: Repurposing pallets keeps them out of landfills while giving you a free or low-cost building material.
- Durable and Sturdy: Good-quality pallets are made to carry heavy loads, which makes them ideal for holding pots, soil, and gardening tools.
- Versatile Design: The slatted structure of pallets is perfect for creating shelves, storage spaces, and even decorative accents.
- Rustic Aesthetic: The natural wood grain and worn textures of pallets add a charming, rustic look that suits many garden styles.
Using pallets is not just practical—it’s also a way to create a custom, one-of-a-kind potting bench that reflects your personal style.
2. Planning Your Potting Bench Design
Every great DIY project starts with a plan. Before cutting or assembling, decide on the size, style, and function of your potting bench.
- Size: Consider the available space in your garden or patio. Standard pallet dimensions are usually 40” x 48”, so plan how many pallets you’ll need. A typical potting bench height is around 36 inches for comfortable standing work.
- Storage Needs: Think about how many shelves, drawers, or hooks you want. Do you need space for soil bags, pots, or gardening tools?
- Design Style: Pallets can be transformed into rustic, modern, or even industrial designs depending on how you finish the wood. Decide if you want to sand and stain for a sleek look or keep the natural, weathered charm.
Sketching your design on paper or using online design tools can save time and help you visualize the final result.
3. Preparing the Wooden Pallets
Not all pallets are created equal, and preparation is crucial for safety and durability.
- Inspect for Damage: Choose pallets that are intact, free from cracks, and not rotting. Avoid pallets that were used for chemicals or treated with harmful substances.
- Clean Thoroughly: Pallets often carry dirt, mold, or residues. Scrub them with soap and water, and allow them to dry completely.
- Remove Nails and Splinters: Use a hammer or pry bar to extract nails. Sand rough areas to prevent injuries.
- Optional Treatment: For outdoor use, consider applying a wood preservative or sealant to protect against moisture, insects, and weathering.
Proper preparation ensures your potting bench is safe, sturdy, and long-lasting.
4. Transforming Pallets into the Bench Frame
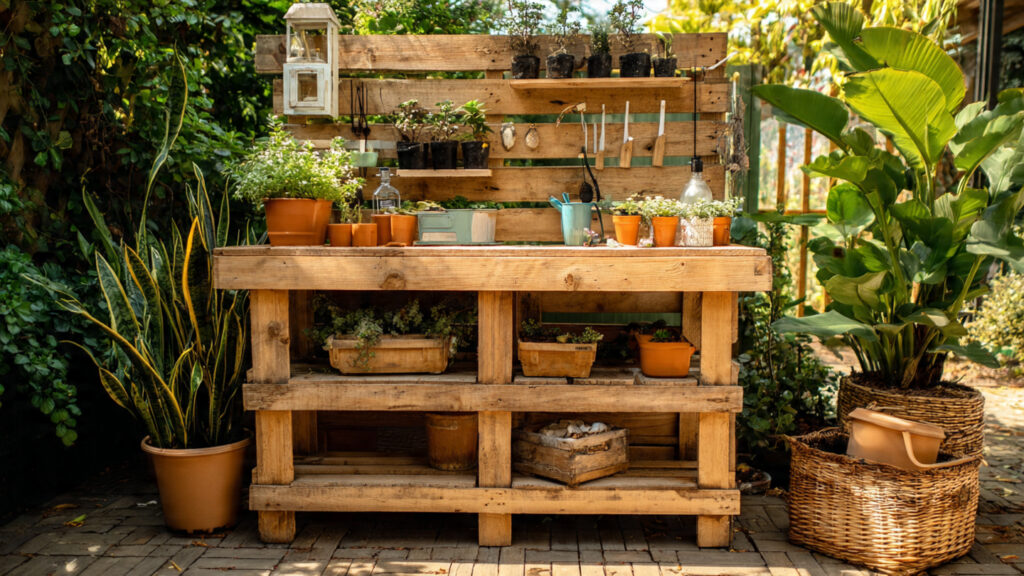
The beauty of pallet furniture is that pallets can serve as the base, shelves, and support frame simultaneously.
- Base Structure: Stack or cut pallets to form the legs and base of your bench. Use screws and brackets for added stability.
- Shelving: The slats on pallets can be used directly as shelves or modified to fit your storage needs.
- Work Surface: Combine multiple pallet boards or add a solid wood plank on top for a flat, stable potting surface.
- Customization: If you want a more designer look, trim the edges, add decorative panels, or even integrate a foldable top for extra workspace.
By cleverly combining the pallets, you can create a bench that is not just functional but also visually striking.
5. Adding Storage and Functional Features
A potting bench isn’t just a table—it’s a gardening workstation. Think about the extra features that make your bench a true garden hero:
- Shelves: Use pallet slats to create lower shelves for storing pots, fertilizers, or watering cans.
- Hooks and Racks: Attach hooks on the sides to hang tools, gloves, or aprons.
- Drawer or Bins: You can build a small drawer or attach bins to hold seeds, labels, and small items.
- Backboard: Install a vertical backboard on your bench to add additional hooks, small shelves, or even a magnetic strip for metal tools.
These additions make your potting bench highly organized and convenient, reducing clutter in your garden space.
6. Finishing Touches for a Designer Look
Once the structure is complete, it’s time to enhance the visual appeal of your potting bench.
- Sanding and Smoothing: Smooth out rough edges for a polished appearance and safe handling.
- Painting or Staining: Choose a weather-resistant paint or stain to match your garden décor. A neutral or earthy tone works well for a rustic look, while bright colors add a playful vibe.
- Sealing: Apply a clear varnish or outdoor wood sealant to protect the bench from rain, sun, and humidity.
- Decorative Accents: Add potted plants, hanging baskets, or DIY labels to make the bench visually inviting.
These finishing touches elevate your recycled pallets from simple materials to a functional designer piece.
7. Placement and Practical Tips
Where you place your potting bench matters as much as how it looks.
- Location: Choose a flat surface with good drainage. Near a water source is ideal for easy cleaning and watering.
- Accessibility: Ensure there’s enough space to move around and work comfortably.
- Mobility: Consider adding caster wheels if you want a movable workstation.
- Maintenance: Regularly inspect for loose screws, damaged boards, or mold to keep your bench safe and durable.
With careful placement, your potting bench becomes the centerpiece of your gardening routine, both functional and stylish.
➡️ How to Grow Malabar Spinach from Cuttings for Fast, Easy Greens
➡️ How to Grow Super Delicious Cabbage at Home Without a Garden
➡️ How to Grow Bean Sprouts at Home in Plastic Bottles Easily (Step‑by‑Step Guide)
➡️ Why is Your Lemon Tree Blooming in the Heart of Winter?
➡️ Why Should Your Garden Have a Dedicated Pollinator Highway?
➡️ Why Do Your Fruit Trees Need a Winter Wash to Thrive in Spring?
➡️ How Can Rice Water Transform Your Fruits into Sweeter Delights?
➡️ Jumpstart Your Winter Garden: Seed Starting Under Lights
8. Environmental and Personal Satisfaction Benefits
Beyond utility and aesthetics, creating a pallet potting bench has environmental and personal benefits:
- Sustainability: Reusing pallets reduces waste and the need for new lumber.
- Cost Savings: Pallets are often free or inexpensive, making this a budget-friendly DIY project.
- Creative Satisfaction: Building a bench from scratch allows for personal expression and the joy of hands-on work.
- Community Appeal: Friends and neighbors are often impressed by DIY upcycling projects, inspiring others to embrace eco-friendly ideas.
It’s a project that not only improves your garden but also feeds your creativity and environmental consciousness.
Final Thoughts
Transforming old wooden pallets into a stunning designer potting bench is a perfect blend of creativity, functionality, and sustainability. From careful preparation of pallets to clever assembly, added storage, and finishing touches, every step brings you closer to a beautiful, practical garden workstation.
Whether you’re an experienced gardener or a DIY enthusiast, a pallet potting bench is a rewarding project that combines style, utility, and eco-friendly ingenuity. The next time you see a stack of old pallets, don’t walk past them—see them for what they really are: the foundation for your next garden masterpiece.
By following these steps, you’ll not only create a functional potting station but also a piece that adds charm and personality to your garden. With a little effort, your old pallets will be transformed into a stunning, durable, and designer-quality potting bench that will serve you for years to come.