Plastic plant pots are the unsung heroes of gardening. They’re lightweight, durable, and perfect for growing everything from houseplants to patio flowers. But let’s face it: plain plastic pots can look cheap and uninspiring, especially when you’re trying to create a stylish garden or indoor plant corner. The good news is that you don’t have to throw them away or spend a fortune on new decorative containers. With a few creative steps, some basic materials, and a bit of patience, you can transform old plastic pots into luxurious stonelook beauties that rival high-end stone or ceramic planters. Here’s how you can do it.
Why Give Plastic Pots a Makeover?
Before we dive into the “how,” let’s talk about the “why.” Plastic pots are ubiquitous in gardening for good reason—they’re cheap, durable, and easy to handle. However, they often lack aesthetic appeal. Old, faded plastic pots may detract from the beauty of your plants, especially if you’re cultivating a stylish indoor garden or a well-curated outdoor space.
Repurposing your old pots is also environmentally friendly. Instead of contributing to plastic waste, you can breathe new life into containers you already own. The stonelook finish is particularly popular because it mimics natural materials like marble, limestone, or granite, instantly adding a sense of sophistication without the hefty price tag or weight.
What You’ll Need for the Transformation
Turning a dull plastic pot into a luxurious stonelook masterpiece doesn’t require professional skills or expensive equipment. Here’s a list of materials you’ll need:
- Old plastic pots (any size or shape)
- Sandpaper (medium grit, around 120-150)
- Acrylic or chalk paint (neutral colors like grey, beige, or white work best)
- Textured paint or modeling paste for a stone effect
- Paintbrushes (various sizes for detail and broad coverage)
- Sponge or rag (for blending and texture)
- Clear sealant (matte or satin finish)
Optional:
- Painter’s tape to create clean lines
- Fine-tip brush for marbling or detailing
Step 1: Prep the Pot
Preparation is crucial for a professional-looking finish. Start by washing your plastic pot thoroughly with soap and water to remove dirt, grease, and old soil residue. Let it dry completely.
Next, use medium-grit sandpaper to lightly roughen the surface of the pot. Plastic is smooth, and paint doesn’t adhere well without a bit of texture. Don’t sand too aggressively—just enough to create a surface that will “grab” the paint. Wipe away any dust with a damp cloth.
Step 2: Prime for Success
While plastic can be painted directly, using a primer ensures better adhesion and longer-lasting results. Apply a thin, even coat of plastic-friendly primer and allow it to dry according to the manufacturer’s instructions. If you’re skipping primer, make sure to apply thin layers of paint, allowing each layer to dry fully.
Step 3: Base Coat
Choose a neutral base color that resembles natural stone—grey, beige, or off-white are excellent starting points. Using a paintbrush or small roller, apply a smooth coat of acrylic or chalk paint. Two thin coats are better than one thick coat, as they prevent streaks and drips. Allow the base coat to dry completely.
Step 4: Create the Stone Texture
Here’s where the magic happens. To replicate the irregularity of real stone, you’ll want to add texture. There are a few ways to do this:
- Textured Paint or Modeling Paste: Apply a thin layer of textured paint or modeling paste over the base coat. Use a sponge, brush, or palette knife to create natural-looking bumps and grooves. Don’t worry about perfection—stone is naturally irregular.
- Sponge Technique: Dab a slightly darker or lighter shade over the base coat using a sponge. Blend it gently to avoid harsh lines. Layering different shades adds depth and realism.
- Marbling: For a luxurious marble effect, lightly streak white or darker tones over the base color with a fine brush or sponge. Work in small, uneven lines to mimic natural stone veins.
Tip: Always work in layers, letting each dry before adding another. Stone rarely has uniform coloring, so uneven, blended patches look more authentic.
Step 5: Detailing
After your texture is complete, step back and assess. You may want to add small, subtle details like:
- Tiny speckles using a toothbrush or stiff brush flicked with paint
- Slight color variations along edges or corners to mimic natural weathering
These small touches elevate your pot from “painted plastic” to “realistic stonelook.”
Step 6: Seal the Finish
Once your stone effect is dry, it’s time to protect your work. Apply a clear matte or satin sealant. This protects the paint from water, UV rays, and soil, ensuring your pot looks stunning for years. Multiple thin coats are better than a single heavy coat. Allow each layer to dry fully.
Step 7: Optional Enhancements
- Gold or Metallic Accents: A hint of metallic paint on edges or in stone veins can create a high-end, luxurious look.
- Planter Feet: Adding small rubber or wooden feet lifts the pot slightly, giving it a more professional and elegant display.
- Matching Collection: Transform multiple pots using the same base technique but vary colors and textures slightly. This creates a cohesive yet dynamic look for grouped plants.
Benefits of a DIY Stonelook Pot
- Cost-effective: Old plastic pots are free or cheap, and basic paint supplies are inexpensive.
- Eco-friendly: Reusing plastic reduces waste and promotes sustainability.
- Customizable: You control size, color, and texture. Match your decor perfectly.
- Durable: A properly sealed stonelook pot withstands sunlight, water, and garden wear.
- Stylish Upgrade: Instantly elevate your plants’ display, whether indoors or outdoors.
Tips for Longevity
- Avoid Harsh Chemicals: Use gentle cleaning solutions to preserve the paint.
- Handle Carefully: While durable, textured paint can chip if handled roughly.
- Seal Regularly: Reapply sealant every couple of years if your pots are outdoors.
- Mind the Drainage: Don’t block drainage holes—proper water flow is essential for healthy plants.
Inspiring Ideas
- Indoor Elegance: Use stonelook pots in neutral shades for living room plants like fiddle leaf figs, monstera, or snake plants.
- Outdoor Chic: Gray or beige stonelook pots blend seamlessly with patios, terraces, or garden pathways.
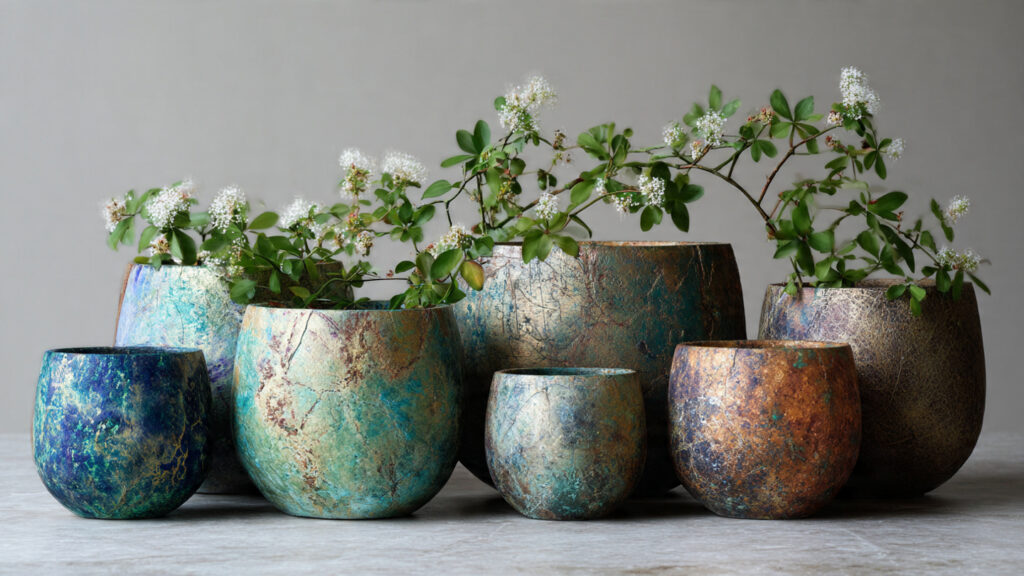
- Mixed Sizes: Group various-sized pots with similar textures for a luxurious, curated display.
Imagine an array of indoor plants displayed in beautifully textured stonelook pots. The pots complement the greenery rather than compete with it, creating a sophisticated, natural aesthetic.
➡️ How to Grow Malabar Spinach from Cuttings for Fast, Easy Greens
➡️ How to Grow Super Delicious Cabbage at Home Without a Garden
➡️ How to Grow Bean Sprouts at Home in Plastic Bottles Easily (Step‑by‑Step Guide)
➡️ Why is Your Lemon Tree Blooming in the Heart of Winter?
➡️ Why Should Your Garden Have a Dedicated Pollinator Highway?
➡️ Why Do Your Fruit Trees Need a Winter Wash to Thrive in Spring?
➡️ How Can Rice Water Transform Your Fruits into Sweeter Delights?
➡️ Jumpstart Your Winter Garden: Seed Starting Under Lights
Final Thoughts
Transforming old plastic pots into luxurious stonelook beauties is a simple, budget-friendly, and eco-conscious way to elevate your gardening game. With minimal tools, some creativity, and a little patience, you can turn ordinary plastic containers into eye-catching statement pieces that make your plants shine.
Not only do these DIY stonelook pots enhance the appearance of your plants, but they also give a sense of satisfaction and pride. Every time you glance at your indoor garden or patio, you’ll see the fruits of your creative effort, and that alone makes the project worthwhile.
So next time you encounter a stack of old plastic pots, don’t toss them aside. With a few coats of paint, some texture, and a dash of imagination, those humble containers can become the centerpiece of your luxurious plant displays—beautiful, timeless, and uniquely yours.