Winter is often a challenging time for gardeners. Cold temperatures, short days, and frozen ground can make growing vegetables and flowers seem impossible. But thanks to modern indoor gardening techniques, it’s entirely possible to jumpstart your winter garden by starting seeds under grow lights. This method not only allows you to get an early start on the growing season but also ensures stronger, healthier seedlings that are ready to transplant when spring arrives.
In this comprehensive guide, we’ll explore the benefits of seed starting under lights, step-by-step instructions, equipment recommendations, and tips for achieving a thriving winter garden.
Why Start Seeds Indoors in Winter?
Starting seeds indoors during winter offers several advantages:
- Extended Growing Season: Many vegetables and flowers require a long growing season. Starting seeds indoors allows you to bypass frost and cold weather, giving plants a head start.
- Stronger Seedlings: Controlled indoor environments protect seeds from harsh outdoor conditions, resulting in robust, healthy seedlings.
- Variety Access: Growing indoors allows you to cultivate rare or delicate varieties that may not survive winter outdoors.
- Continuous Harvest: Early planting means your garden produces harvestable crops sooner, giving you an extended harvest period.
Seed starting under lights is a versatile method that works for vegetables, herbs, and flowers alike, making it ideal for gardeners of all experience levels.
Choosing the Right Seeds
The first step to a successful winter garden is selecting seeds suited to indoor starting.
Vegetables
- Tomatoes: Fast-growing, ideal for transplanting in spring.
- Peppers: Require warm, consistent conditions to germinate.
- Lettuce and Spinach: Quick-growing greens that can thrive under lights.
- Cabbage and Broccoli: Cold-tolerant and perfect for early spring planting.
Herbs
- Basil: Needs warmth and consistent light.
- Parsley and Cilantro: Hardy herbs that grow well indoors.
- Chives: Compact, easy to grow under artificial lighting.
Flowers
- Marigolds: Bright, resilient flowers that can start indoors in winter.
- Petunias: Produce vibrant blooms for spring gardens.
- Snapdragons: Thrive when started early, giving long-lasting color.
Choosing seeds carefully ensures that your winter seedlings will thrive and give you the maximum advantage when transplanting outdoors.
Setting Up Your Indoor Seed Station
Creating an optimal environment for seed germination is essential. You’ll need the right equipment and setup to ensure success.
1. Seed Trays and Containers
- Options: Standard seed trays, small pots, or even recycled containers like yogurt cups work well.
- Drainage: Ensure all containers have drainage holes to prevent waterlogging and root rot.
- Tray Lids: Clear plastic covers help retain moisture and warmth, creating a mini-greenhouse effect.
2. Growing Medium
- Seed-Starting Mix: Use a light, well-draining mix specifically designed for seedlings. Avoid garden soil, which can compact and harbor pathogens.
- Optional Amendments: Adding perlite or vermiculite improves aeration and drainage.
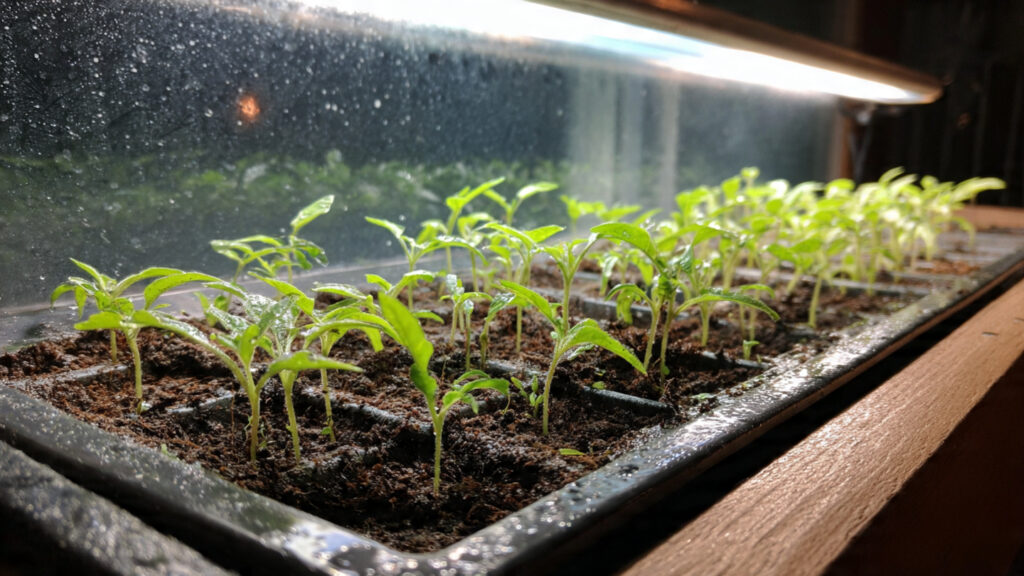
3. Grow Lights
Winter sunlight is limited, so supplemental lighting is crucial.
- LED Grow Lights: Energy-efficient, long-lasting, and customizable for spectrum.
- Fluorescent Lights: Affordable and effective for seed starting.
- Placement: Position lights 2–4 inches above seedlings and adjust as they grow.
- Duration: Seedlings require 12–16 hours of light per day for optimal growth.
4. Temperature Control
- Warmth: Most seeds germinate best at 65–75°F (18–24°C).
- Heat Mats: Optional but helpful for warmth-loving seeds like peppers and tomatoes.
- Air Circulation: A small fan improves air movement and prevents fungal issues like damping-off.
Step-by-Step Seed Starting Process
Step 1: Prepare Containers
Fill trays or pots with seed-starting mix, lightly pressing to create a firm but airy surface. Moisten the soil evenly.
Step 2: Sow Seeds
Plant seeds according to the depth instructions on the packet. Tiny seeds, like lettuce, should be surface-sown, while larger seeds, like tomatoes, go deeper.
Step 3: Cover and Maintain Moisture
Use a clear lid or plastic wrap to retain moisture. Check daily and mist as needed to keep soil damp but not soggy.
Step 4: Provide Light
Once seeds sprout, remove the cover and position your grow lights 2–4 inches above the seedlings. Adjust as they grow to maintain proper distance.
Step 5: Thin Seedlings
When seedlings develop their first true leaves, thin them to prevent overcrowding. Select the strongest plants and snip weaker ones at soil level.
Step 6: Fertilize
After seedlings develop two sets of true leaves, apply a diluted, balanced liquid fertilizer every 1–2 weeks. This ensures strong, healthy growth without burning the roots.
Step 7: Hardening Off
Before transplanting outdoors, gradually acclimate seedlings to outdoor conditions. Start by placing them outside for a few hours a day, gradually increasing exposure over 7–10 days.
➡️ How to Grow Malabar Spinach from Cuttings for Fast, Easy Greens
➡️ How to Grow Super Delicious Cabbage at Home Without a Garden
➡️ How to Grow Bean Sprouts at Home in Plastic Bottles Easily (Step‑by‑Step Guide)
➡️ Why is Your Lemon Tree Blooming in the Heart of Winter?
➡️ Why Should Your Garden Have a Dedicated Pollinator Highway?
➡️ Why Do Your Fruit Trees Need a Winter Wash to Thrive in Spring?
➡️ How Can Rice Water Transform Your Fruits into Sweeter Delights?
➡️ Jumpstart Your Winter Garden: Seed Starting Under Lights
Troubleshooting Common Issues
Starting seeds indoors comes with its own challenges. Here’s how to overcome them:
1. Leggy Seedlings
- Cause: Insufficient light.
- Solution: Lower lights closer to seedlings, maintain 12–16 hours of light daily, and consider a reflective surface to maximize light exposure.
2. Damping-Off
- Cause: Fungal infection from overly wet, poorly ventilated conditions.
- Solution: Improve airflow, avoid overwatering, and use sterile seed-starting mix.
3. Slow Germination
- Cause: Cold soil or seeds planted too deep.
- Solution: Use heat mats for warmth-loving seeds and ensure correct planting depth.
4. Nutrient Deficiency
- Cause: Seedlings outgrow initial soil nutrients.
- Solution: Begin light fertilization once true leaves appear to maintain healthy growth.
Benefits of Seed Starting Under Lights
- Early Harvest: Extends your growing season and allows earlier harvests.
- Stronger Plants: Indoor conditions produce more resilient, uniform seedlings.
- Variety Selection: Grow unusual or heirloom varieties that may not perform well in winter outdoors.
- Cost-Effective: Producing your own seedlings is often cheaper than buying transplants from a nursery.
Creating a Productive Winter Gardening Routine
- Plan Ahead: Select seeds 6–8 weeks before your last expected frost date.
- Set a Schedule: Maintain consistent light, water, and temperature for healthy growth.
- Label Everything: Use plant markers to track varieties and germination dates.
- Rotate Trays: Ensure even light exposure and prevent leggy growth.
- Keep Records: Note germination rates, growth patterns, and fertilization schedules for improved success in future seasons.
Additional Tips for Success
- Reflective Surfaces: Use white boards or aluminum foil around seedlings to reflect light evenly.
- Companion Planting: Start herbs alongside vegetables to maximize space and efficiency.
- Stackable Systems: Utilize vertical space with multi-tier seed trays for large-scale indoor seed starting.
- Humidity Management: Maintain 50–70% humidity for optimal germination; use a humidity dome if needed.
Conclusion
Seed starting under lights is a powerful way to jumpstart your winter garden. By carefully selecting seeds, setting up the right growing environment, and maintaining consistent care, you can produce healthy, vigorous seedlings ready to transplant in early spring.
This method extends your growing season, increases your harvest potential, and provides access to a wide range of vegetables, herbs, and flowers. With the right equipment—seed trays, quality growing medium, proper lighting, and temperature control—any gardener can succeed indoors, even when outdoor conditions are harsh.
Winter no longer needs to be a dormant period for gardeners. By embracing seed starting under lights, you can transform indoor spaces into thriving nurseries, ensuring that when spring arrives, your garden bursts forth with life, color, and productivity.