Transforming your outdoor space doesn’t always require expensive tools or fancy landscaping. In fact, some of the most eye-catching gardens are born from creativity and sustainability. One of the most innovative trends in 2026 is turning dry stumps and discarded plastic bottles into stunning garden features. Not only does this approach recycle materials that would otherwise go to waste, but it also adds a unique charm and personality to your outdoor space. Here’s a complete guide on creating a beautiful DIY garden using dry stumps and plastic bottles.
Why Choose Dry Stumps and Plastic Bottles for Your Garden?
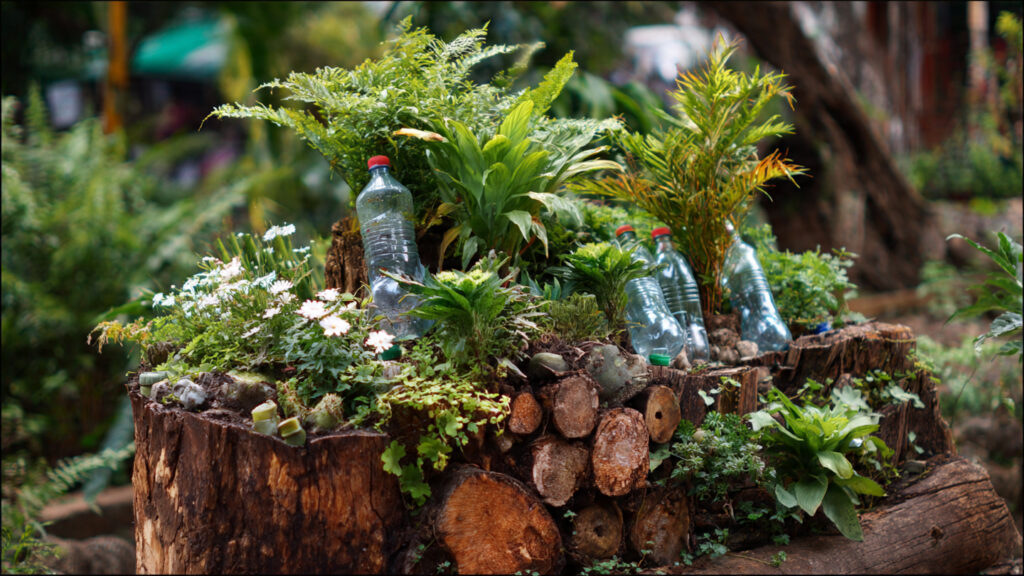
Before diving into the DIY steps, it’s important to understand why this combination is so effective. Dry stumps, whether naturally occurring or leftover from old trees, provide a strong, rustic base that can serve as natural planters or decorative features. Plastic bottles, on the other hand, are versatile, lightweight, and easy to customize.
By combining the two, you create a garden that is eco-friendly, cost-effective, and incredibly creative. This approach allows gardeners to think outside the box, using materials that are often considered “trash” to craft something beautiful and functional.
Materials You’ll Need
To get started, gather the following materials:
- Dry stumps of varying sizes (or old tree roots)
- Plastic bottles (different shapes and sizes)
- Soil and compost
- Paints (preferably eco-friendly)
- Scissors or craft knife
- Rope or twine
- Drill (optional, for drainage holes)
- Decorative stones or pebbles
These basic items are often already available at home, making this project beginner-friendly and budget-conscious.
Step 1: Selecting the Right Stump
The first step in your DIY garden makeover is choosing the right dry stump. Look for stumps that are stable, solid, and free from rot. Ideally, select stumps with natural cracks, crevices, or hollows that can serve as pockets for planting flowers or succulents.
If you have multiple stumps, consider arranging them in different heights to create layers in your garden. This variation adds depth and visual interest, making your garden more dynamic and lively.
Step 2: Preparing the Plastic Bottles
Plastic bottles are incredibly versatile and can be transformed in numerous ways:
- Cutting for Planters: Cut the bottles in half or create an opening large enough for soil and plants.
- Coloring for Visual Appeal: Paint the bottles in bright, cheerful colors or create patterns. Use non-toxic paints to keep the environment safe.
- Creating Hanging Elements: Punch holes in the bottle caps and thread rope through to hang planters from branches or hooks.
- Vertical Garden Options: Stack bottles or connect them horizontally to build vertical planter walls.
These small adjustments allow you to repurpose plastic bottles into charming containers that fit naturally with your garden’s aesthetic.
Step 3: Assembling the Stump Garden
Now comes the creative part: combining the stump and plastic bottles. There are multiple ways to approach this:
- Planter Inlay: Fill the natural hollows of the stump with soil and insert painted plastic bottle planters into the crevices.
- Bottle Cascade: Attach cut and painted bottles to the sides of the stump using rope, twine, or nails, creating a cascading effect for trailing plants.
- Tiered Design: Use smaller stumps as separate levels and place bottles on top, forming a tiered mini-garden.
The beauty of this method is that it allows for endless creativity. No two stump gardens need to look the same, so you can truly personalize your outdoor space.
Step 4: Choosing the Right Plants
Plant selection is key to creating a thriving and visually appealing garden. Here are some excellent options for stump and bottle gardens:
- Succulents and Cacti: Perfect for shallow bottles or small crevices in the stump. Low maintenance and visually striking.
- Herbs: Mint, basil, or rosemary work well and add fragrance to your garden.
- Trailing Plants: Ivy, spider plants, or string-of-pearls can cascade over the edges for a natural look.
- Flowering Plants: Marigolds, petunias, or pansies bring color and vibrancy to your arrangement.
Mixing different plant types adds texture, color, and variety, making your DIY garden a true centerpiece.
Step 5: Adding Decorative Touches
Once your plants are in place, it’s time to elevate your garden’s visual appeal:
- Pebbles and Stones: Place small stones around the base of the stump or inside the bottles for decoration and better drainage.
- Painted Accents: Use paints to add patterns, stripes, or polka dots on the stump or bottles.
- Mini Garden Figures: Small wooden animals, fairy figurines, or tiny benches can make your garden whimsical and fun.
- Lighting: Incorporate solar-powered fairy lights or LED lanterns to make your garden glow at night.
These touches bring personality to your garden and make it a true reflection of your creativity.
➡️ How to Grow Malabar Spinach from Cuttings for Fast, Easy Greens
➡️ How to Grow Super Delicious Cabbage at Home Without a Garden
➡️ How to Grow Bean Sprouts at Home in Plastic Bottles Easily (Step‑by‑Step Guide)
➡️ Why is Your Lemon Tree Blooming in the Heart of Winter?
➡️ Why Should Your Garden Have a Dedicated Pollinator Highway?
➡️ Why Do Your Fruit Trees Need a Winter Wash to Thrive in Spring?
➡️ How Can Rice Water Transform Your Fruits into Sweeter Delights?
➡️ Jumpstart Your Winter Garden: Seed Starting Under Lights
Step 6: Placement and Layout Tips
Where you place your DIY garden matters just as much as how you build it. Consider these tips:
- Sunlight: Most plants need adequate sunlight, so place the garden in a spot that gets 4–6 hours of sun daily.
- Accessibility: Ensure the bottles and stump are easy to water and maintain.
- Visual Impact: Position taller stumps at the back and shorter ones at the front to create depth.
- Protection: Keep the garden away from strong winds or heavy rainfall that could tip over the bottles.
A well-thought-out layout enhances the overall charm and functionality of your outdoor space.
Step 7: Maintenance Tips
Maintaining a DIY stump and bottle garden is simple but requires attention:
- Watering: Water the plants regularly but avoid overwatering, especially for succulents.
- Fertilizing: Use organic fertilizers to nourish your plants and promote healthy growth.
- Pruning: Trim plants as needed to maintain shape and encourage new growth.
- Cleaning Bottles: If bottles accumulate dirt or algae, wipe them clean to maintain aesthetics.
With a little care, your garden will remain vibrant and eye-catching year-round.
Step 8: Eco-Friendly Benefits
This DIY garden isn’t just visually appealing; it’s also environmentally responsible:
- Recycling Plastic: Repurposing bottles reduces waste and keeps plastic out of landfills.
- Sustainable Materials: Using dry stumps avoids cutting down new trees while giving old ones a second life.
- Promoting Biodiversity: By choosing a mix of plants, your garden attracts pollinators and supports local wildlife.
Creating a garden like this is a small but meaningful step toward sustainable living.
Step 9: Inspiring Creativity
One of the most exciting aspects of a stump and bottle garden is the freedom to experiment. Try unusual color combinations, stack bottles in different ways, or even carve patterns into the stumps. There’s no right or wrong—it’s all about expressing your creativity and making a garden that inspires you.
This project is perfect for families, DIY enthusiasts, or anyone looking to add a personal touch to their outdoor space. It’s also an excellent way to engage children in gardening and teach them about sustainability.
Step 10: Share Your Garden Story
Finally, don’t forget to share your DIY garden with the world. Documenting your process on social media or with friends inspires others to explore eco-friendly gardening. Your creation could motivate neighbors or local community members to repurpose materials and rethink how they approach gardening.
Sharing tips, photos, and even videos can turn your simple DIY project into a source of inspiration for a wider audience. In 2026, creativity combined with sustainability is a trend everyone can get behind.
Final Thoughts
A beautiful garden doesn’t require a huge budget or expensive tools. With a dry stump, a few plastic bottles, and a little imagination, you can create a stunning, eco-friendly garden that delights the senses and benefits the environment. This DIY project is versatile, sustainable, and incredibly rewarding.
By combining recycled materials, thoughtful plant selection, and decorative touches, your outdoor space becomes more than a garden—it becomes a statement of creativity and environmental responsibility. In 2026, gardens like these represent the future of outdoor design: smart, artistic, and sustainable.
So grab your dry stumps and bottles, get creative, and give your outdoor space a makeover that’s beautiful, eco-friendly, and uniquely yours.