As cities grow and living spaces shrink, the dream of having a lush garden can feel out of reach. But what if you could turn everyday plastic bottles into a thriving vertical garden right on your balcony, terrace, or even indoors? Not only does this eco-friendly project help you grow fresh herbs, vegetables, and flowers, but it also supports sustainable living by reusing plastic waste creatively. In this guide, we’ll walk you through an easy, step-by-step method to transform ordinary bottles into a beautiful vertical garden.
1. Why Choose Plastic Bottles for a Vertical Garden?
Plastic bottles are everywhere—from water bottles to soda containers—and many end up in landfills or oceans. By repurposing them into a vertical garden, you reduce waste and make a positive environmental impact.
Benefits of using plastic bottles:
- Cost-effective: Plastic bottles are free or very cheap to collect.
- Lightweight: Easy to hang or stack vertically without heavy supports.
- Customizable: You can cut and arrange bottles to fit any space.
- Reusable: Bottles can last for years if cleaned and maintained properly.
Using plastic bottles not only creates a functional garden but also turns a recycling project into a creative and practical decor element for your home.
2. Materials You’ll Need
Before you start, gather these materials:
- Empty plastic bottles (any size, 500ml–2L works well)
- Scissors or a utility knife
- Drill or nail (for making drainage holes)
- Rope, strings, or wooden planks (to hang bottles vertically)
- Potting soil suitable for your plants
- Seeds or seedlings of herbs, vegetables, or flowers
- Optional: Paint or markers for decoration
Having all your materials ready ensures a smooth building process and lets you focus on planting and growing rather than scrambling for supplies.
3. Preparing the Bottles
The first step is to get your bottles ready for planting.
Step-by-step preparation:
- Clean thoroughly: Remove labels and wash bottles with warm, soapy water to avoid mold growth.
- Cut the bottles: Depending on your design, cut the bottle in half, or create a side opening to insert soil and seedlings.
- Drainage holes: Use a drill or nail to make 2–3 small holes at the bottom. Proper drainage prevents waterlogging and root rot.
- Decoration (optional): Paint the bottles with non-toxic paint or decorate with patterns to match your home aesthetic.
Proper preparation ensures a safe and efficient growing environment for your plants.
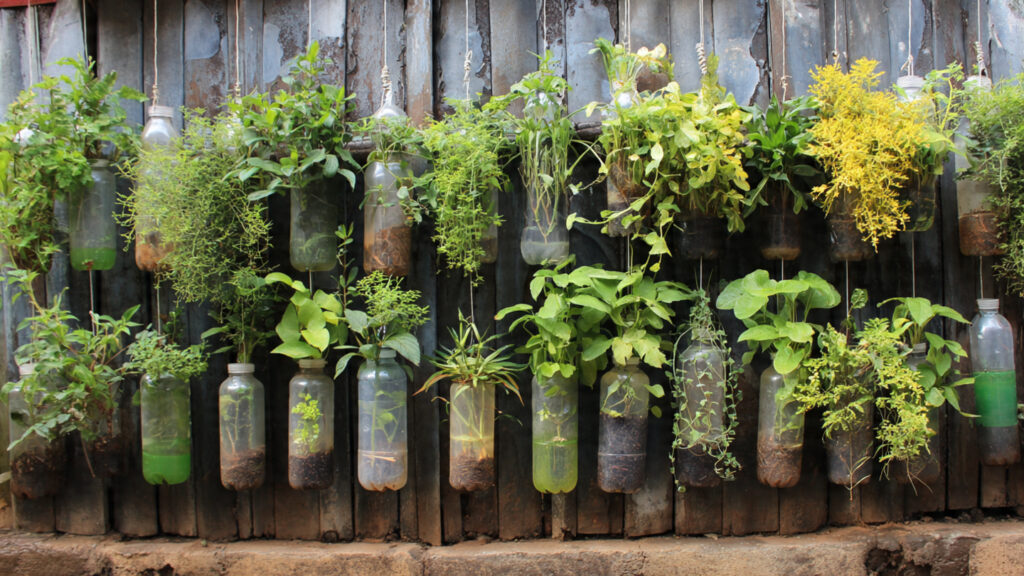
4. Designing Your Vertical Garden
Vertical gardens can be arranged in several creative ways depending on your available space.
Popular designs:
- Hanging bottle garden: Punch holes near the bottle necks, thread a rope through, and hang bottles one below the other.
- Wall-mounted system: Attach bottles to a wooden plank or wall with hooks, allowing easy access for watering.
- Stacked towers: Stack bottles horizontally or vertically, securing them with a rod or string to form a small tower garden.
Choose a design that matches your space and ensures adequate sunlight for all plants. Herbs like basil, mint, and coriander work well, as do small vegetables such as cherry tomatoes or lettuce.
5. Filling Bottles and Planting
Once your bottles are arranged, it’s time to plant.
Filling and planting tips:
- Add soil: Fill bottles 3/4 full with quality potting mix. Avoid garden soil, which can compact and restrict root growth.
- Plant seeds or seedlings: Follow spacing instructions on seed packets. Small plants like herbs can be closer together, while vegetables need more room.
- Water lightly: Moist soil encourages root growth, but don’t oversaturate.
This method ensures your plants have enough nutrients and room to thrive in a compact vertical system.
➡️ How to Grow Malabar Spinach from Cuttings for Fast, Easy Greens
➡️ How to Grow Super Delicious Cabbage at Home Without a Garden
➡️ How to Grow Bean Sprouts at Home in Plastic Bottles Easily (Step‑by‑Step Guide)
➡️ Why is Your Lemon Tree Blooming in the Heart of Winter?
➡️ Why Should Your Garden Have a Dedicated Pollinator Highway?
➡️ Why Do Your Fruit Trees Need a Winter Wash to Thrive in Spring?
➡️ How Can Rice Water Transform Your Fruits into Sweeter Delights?
➡️ Jumpstart Your Winter Garden: Seed Starting Under Lights
6. Watering and Maintenance
Vertical gardens in plastic bottles dry out faster than traditional garden beds, so consistent watering is essential.
Maintenance tips:
- Water from the top to allow gravity to distribute moisture to lower bottles.
- Rotate the bottles periodically to ensure even sunlight exposure.
- Trim overgrown plants to encourage new growth and prevent overcrowding.
- Check drainage holes to prevent waterlogging.
With regular attention, your vertical garden can stay healthy and productive throughout the year.
7. Choosing the Right Plants
Not all plants are ideal for vertical bottle gardens. Focus on species that thrive in confined spaces and have shallow roots.
Best options include:
- Herbs: Basil, mint, parsley, thyme, and coriander
- Vegetables: Lettuce, spinach, cherry tomatoes, peppers
- Flowers: Marigold, petunia, pansy, and nasturtium
Choosing the right plants makes maintenance easier and ensures vibrant growth and blooms in your vertical setup.
8. Advantages of a Vertical Bottle Garden
Creating a vertical garden from plastic bottles offers multiple benefits beyond aesthetics.
- Space-saving: Ideal for apartments, balconies, or small yards.
- Sustainable living: Reduces plastic waste and promotes eco-friendly practices.
- Improved air quality: Plants absorb carbon dioxide and release oxygen.
- Fresh produce: Enjoy homegrown herbs and vegetables without chemical pesticides.
- Stress relief: Gardening is therapeutic and enhances mental well-being.
This DIY project combines functionality, beauty, and environmental responsibility in one simple system.
9. Common Challenges and Solutions
Even the simplest vertical gardens may face challenges. Here’s how to address them:
- Roots growing out of drainage holes: Re-pot or trim roots if they become overcrowded.
- Uneven sunlight exposure: Rotate the bottles regularly for balanced growth.
- Overwatering: Ensure drainage holes are clear and water only when soil is dry.
- Pest issues: Check plants weekly for aphids or whiteflies; use organic insecticidal soap if needed.
Being proactive ensures your bottle garden remains healthy and productive.
10. Expanding Your Vertical Garden
Once you’re comfortable with a few bottles, you can expand your garden creatively:
- Add more rows or columns of bottles for a mini urban farm.
- Incorporate a drip irrigation system to automate watering.
- Mix flowers and vegetables to enhance aesthetics and biodiversity.
- Teach children about recycling and gardening by involving them in DIY bottle projects.
Expansion encourages long-term sustainable gardening habits and makes your living space greener and healthier.
11. Inspiring Sustainable Living Through DIY Gardens
A vertical garden from plastic bottles is more than just a home project—it’s a statement about mindful living. Every bottle reused reduces environmental waste, and every plant grown encourages self-sufficiency and eco-conscious habits.
By embracing this simple DIY technique, you contribute to sustainable living practices while enjoying the benefits of a productive and beautiful green space. It’s a win-win for both you and the planet.
12. Conclusion
Creating a vertical garden from plastic bottles is an easy, cost-effective, and environmentally friendly way to bring greenery into your home. By preparing bottles properly, choosing the right plants, and maintaining your vertical system with consistent care, you can enjoy fresh herbs, vegetables, and flowers year-round.
This DIY project not only maximizes space but also promotes sustainable living, turning plastic waste into a productive, decorative, and green addition to your home. Whether you live in a small apartment or a compact terrace, a vertical bottle garden allows you to reconnect with nature and experience the joy of growing your own food and flowers—all while helping the planet one recycled bottle at a time.