In a world where space is shrinking and waste is growing, finding creative ways to live sustainably has never been more important. One of the simplest and most rewarding eco-friendly projects you can try at home is building a vertical garden from plastic bottles.
This DIY method transforms everyday waste into a beautiful, productive green space. Whether you live in a small apartment, have limited outdoor space, or simply want to recycle creatively, a plastic bottle vertical garden is an easy, affordable, and sustainable solution.
In this guide, you’ll learn exactly how to create your own vertical garden step by step, along with tips for choosing the best plants and maintaining your new green wall.
Why Build a Vertical Garden from Plastic Bottles?
Plastic bottles are one of the most common household waste items. Instead of throwing them away, repurposing them into planters gives them a second life while helping the environment.
A vertical bottle garden offers many benefits:
- Reduces plastic waste
- Saves space in small homes and balconies
- Improves air quality
- Adds greenery and beauty to your surroundings
- Provides fresh herbs and vegetables
- Encourages sustainable living habits
Vertical gardening is especially perfect for urban gardeners who want to grow plants without needing a large backyard.
What Is a Plastic Bottle Vertical Garden?
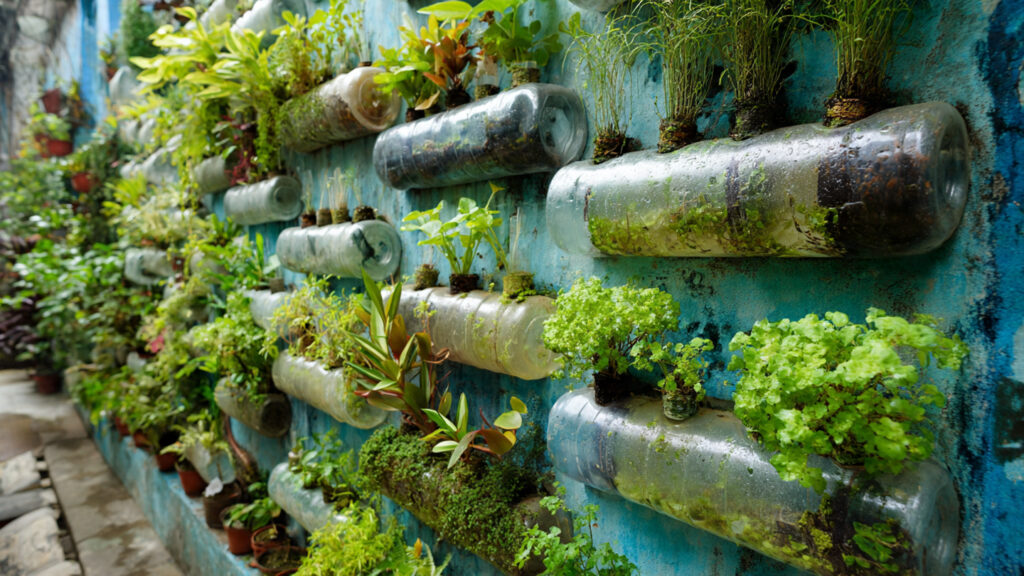
A plastic bottle vertical garden is a creative arrangement where used bottles are turned into planters and mounted vertically on a wall, fence, balcony railing, or hanging frame.
Instead of planting in traditional pots, you use recycled bottles as mini containers, stacked or hung in rows. This creates a “living wall” that is both functional and visually appealing.
Materials You’ll Need
The best part about this DIY project is that it requires very few supplies. Most items can be found at home.
Basic Materials:
- Empty plastic bottles (1–2 liter bottles work best)
- Scissors or a sharp utility knife
- Rope, twine, or strong wire
- Nails, hooks, or wall-mounted screws
- Potting soil
- Small plants or seeds
- Marker for cutting guidelines
Optional Helpful Items:
- Acrylic paint (for decoration)
- Drill or heated nail (to make drainage holes)
- Compost or organic fertilizer
Step-by-Step Guide: How to Make a Vertical Garden from Plastic Bottles
Let’s walk through the process in a simple and beginner-friendly way.
Step 1: Collect and Clean the Bottles
Start by gathering plastic bottles you would normally throw away.
- Remove labels
- Wash thoroughly with soap and water
- Let them dry completely
Clean bottles prevent mold, pests, and bad odors in your garden.
Step 2: Decide Your Vertical Garden Style
There are two popular designs:
1. Horizontal Bottle Planters (Wall-Mounted)
Bottles are cut open on the side and attached horizontally in rows.
Best for: herbs, leafy greens, flowers.
➡️ How to Grow Malabar Spinach from Cuttings for Fast, Easy Greens
➡️ How to Grow Super Delicious Cabbage at Home Without a Garden
➡️ How to Grow Bean Sprouts at Home in Plastic Bottles Easily (Step‑by‑Step Guide)
➡️ Why is Your Lemon Tree Blooming in the Heart of Winter?
➡️ Why Should Your Garden Have a Dedicated Pollinator Highway?
➡️ Why Do Your Fruit Trees Need a Winter Wash to Thrive in Spring?
➡️ How Can Rice Water Transform Your Fruits into Sweeter Delights?
➡️ Jumpstart Your Winter Garden: Seed Starting Under Lights
2. Hanging Bottle Towers (Vertical Hanging)
Bottles are stacked or hung vertically using rope.
Best for: strawberries, trailing plants, decorative greenery.
Choose the style that suits your space and plant choices.
Step 3: Cut the Bottles into Planters
For a horizontal planter:
- Place the bottle on its side
- Draw a rectangular opening on the top side
- Carefully cut along the outline
- Smooth sharp edges with sandpaper or tape
Leave enough plastic around the opening so the bottle stays strong.
Step 4: Make Drainage Holes
Drainage is essential because plants don’t like soggy roots.
- Use a drill or heated nail
- Poke 3–5 small holes in the bottom of each bottle
- Add a few holes on the sides for airflow
This prevents root rot and keeps plants healthy.
Step 5: Attach Bottles to a Wall or Frame
Wall-Mounted Method:
- Use hooks or nails to support each bottle
- Arrange bottles in rows or columns
- Leave enough space between them for plant growth
Rope-Hanging Method:
- Make two holes near each end of the bottle
- Thread rope through the holes
- Tie knots underneath to hold bottles in place
- Hang from a strong support beam or balcony railing
Always ensure the structure is sturdy, especially after watering.
Step 6: Add Soil and Compost
Fill each bottle with a good soil mix:
- 70% potting soil
- 20% compost
- 10% sand or coco peat (for drainage)
Don’t overfill—leave a little space at the top to prevent spilling when watering.
Healthy soil is the foundation of a thriving vertical garden.
Step 7: Plant Your Seeds or Seedlings
Now comes the fun part—planting!
Best Plants for Plastic Bottle Vertical Gardens:
Herbs:
- Basil
- Mint
- Cilantro
- Parsley
- Oregano
Leafy Greens:
- Lettuce
- Spinach
- Kale
Small Vegetables:
- Cherry tomatoes
- Green onions
- Chili peppers
Decorative Plants:
- Pothos
- Spider plants
- Succulents
- Petunias
Choose plants with shallow roots since bottle planters have limited space.
Step 8: Water Carefully
Vertical gardens dry out faster than ground gardens, so watering needs attention.
Watering Tips:
- Water gently to avoid washing soil out
- Use a spray bottle for young seedlings
- Water in the morning for best absorption
- Avoid overwatering—check soil moisture first
You can also create a simple drip system by making tiny holes in the top bottle so water flows down through the row.
Step 9: Place Your Garden in the Right Location
Sunlight is essential for plant growth.
Most edible plants need:
- 4–6 hours of sunlight daily
Ideal spots include:
- Balcony walls
- Kitchen windows
- Fence panels
- Outdoor patios
If sunlight is limited, grow shade-tolerant plants like mint or pothos.
Step 10: Maintain Your Vertical Bottle Garden
A vertical garden is easy to care for with small regular habits:
- Trim herbs often to encourage growth
- Remove yellow leaves
- Add compost every few weeks
- Watch for pests like aphids
- Rotate bottles occasionally for even sunlight
With proper care, your garden will stay lush and productive.
Creative Decoration Ideas
Want your vertical garden to look even more attractive?
Try these ideas:
- Paint bottles in bright colors
- Add labels for each herb
- Use recycled wooden pallets as a frame
- Combine flowers and vegetables for a mixed green wall
- Add fairy lights for balcony beauty
A vertical bottle garden can become both a food source and a piece of living art.
Environmental Impact: Why This DIY Matters
Plastic pollution is one of the biggest environmental challenges today. By repurposing bottles into gardens, you:
- Reduce waste in landfills
- Promote recycling awareness
- Encourage green living
- Grow food sustainably at home
Even a small vertical garden contributes to a healthier planet.
Final Thoughts
Creating a vertical garden from plastic bottles is one of the easiest and most impactful DIY projects for sustainable living. It requires minimal space, costs almost nothing, and turns waste into something truly beautiful and useful.
Whether you want fresh herbs outside your kitchen, a green balcony wall, or a fun eco-project with your family, this bottle garden is the perfect start.
With a little creativity and care, you can build a thriving vertical garden that supports both your lifestyle and the environment—one plastic bottle at a time.