If you’ve ever wanted to grow fresh greens at home but thought you needed a garden, a backyard, or bags of messy soil—good news: you don’t.
Microgreens are one of the easiest, fastest, and most rewarding plants you can grow indoors, even in the smallest apartment. And the best part? You can grow them without soil at all.
Instead of dirt, you can use coconut-based growing medium, which is clean, lightweight, eco-friendly, and perfect for beginners.
In this guide, you’ll learn exactly how to grow microgreens super easily using coconut—no soil, no stress, just fresh, nutritious greens in about a week.
What Are Microgreens?
Microgreens are young vegetable greens harvested just after the first leaves develop. They are not sprouts, and they’re not full-grown plants—they’re the perfect in-between stage.
Popular microgreens include:
- Radish
- Broccoli
- Mustard
- Sunflower
- Pea shoots
- Basil
- Cilantro
These tiny greens are packed with flavor and nutrients, often containing more vitamins than mature vegetables.
Why Grow Microgreens Without Soil?
Traditional gardening soil can be messy indoors. It can also carry pests, mold, or bacteria if not handled properly.
That’s why soilless microgreen growing has become so popular.
Growing without soil means:
- Cleaner indoor gardening
- No dirt spills
- Less risk of pests
- Easier harvesting
- Perfect for small spaces
And coconut growing medium makes the whole process even simpler.
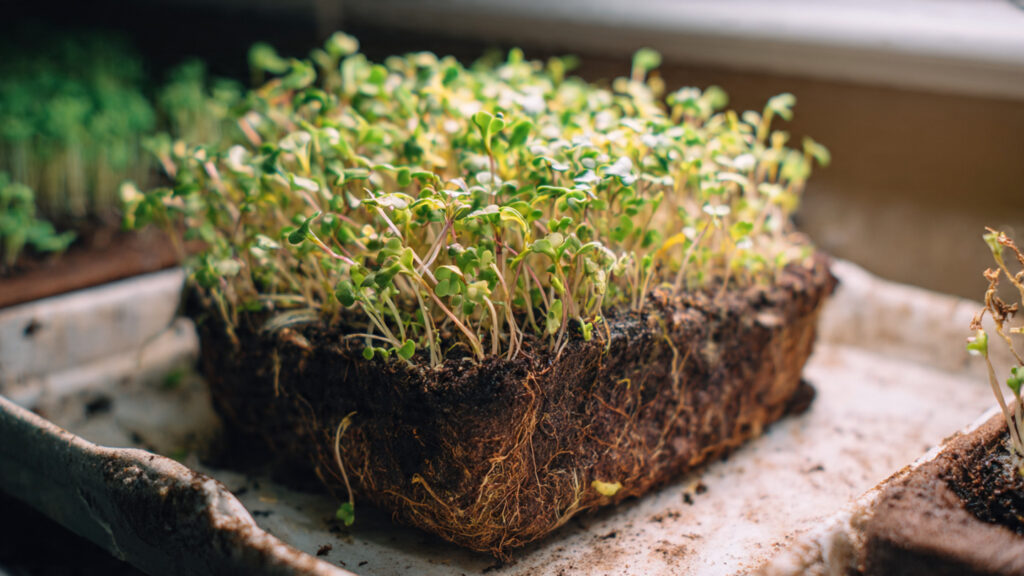
Why Coconut Is the Perfect Soil Alternative
When we say “coconut,” we’re talking about coconut coir, a natural fiber made from the husk of coconuts.
Coconut coir is amazing for microgreens because it is:
- Lightweight
- Highly absorbent
- Excellent for root growth
- Naturally resistant to mold
- Sustainable and eco-friendly
Unlike soil, it doesn’t compact easily, so roots stay healthy and oxygenated.
What You’ll Need to Grow Microgreens Using Coconut
You don’t need fancy equipment. A simple DIY setup works perfectly.
➡️ How to Grow Malabar Spinach from Cuttings for Fast, Easy Greens
➡️ How to Grow Super Delicious Cabbage at Home Without a Garden
➡️ How to Grow Bean Sprouts at Home in Plastic Bottles Easily (Step‑by‑Step Guide)
➡️ Why is Your Lemon Tree Blooming in the Heart of Winter?
➡️ Why Should Your Garden Have a Dedicated Pollinator Highway?
➡️ Why Do Your Fruit Trees Need a Winter Wash to Thrive in Spring?
➡️ How Can Rice Water Transform Your Fruits into Sweeter Delights?
➡️ Jumpstart Your Winter Garden: Seed Starting Under Lights
Here’s what you need:
- Microgreen seeds (radish, broccoli, pea, etc.)
- Coconut coir brick or loose coir
- Shallow tray or container (with drainage holes)
- Another tray underneath (to catch water)
- Spray bottle
- Light source (sunny window or grow light)
- Scissors for harvesting
That’s it—no garden, no soil bags, no complicated tools.
Step-by-Step: How to Grow Microgreens Using Coconut Coir
Let’s walk through the process from start to harvest.
Step 1: Prepare the Coconut Coir
If you’re using a compressed coconut brick:
- Place it in a bucket
- Add warm water
- Let it expand for 10–15 minutes
- Fluff it up with your hands
The coir should feel moist but not soaking wet.
Step 2: Fill Your Tray
Spread the coconut coir into your tray about:
- 1 to 1.5 inches deep
Press it down gently to create an even surface, but don’t pack it tightly.
Microgreens don’t need deep soil—just enough for roots to grip.
Step 3: Sprinkle Seeds Evenly
Now comes the fun part.
Take your seeds and scatter them evenly across the surface.
Tips:
- Don’t overcrowd
- Seeds should sit close but not piled on top of each other
- Larger seeds like peas need more spacing
You want a thick carpet of greens, not a crowded jungle.
Step 4: Mist and Cover
Spray the seeds lightly with water using a mist bottle.
Then cover the tray for the first 2–3 days to encourage germination.
You can use:
- Another tray flipped upside down
- A humidity dome
- A clean towel
This creates darkness and moisture, which seeds love.
Step 5: Keep Moist During Germination
For the first few days:
- Mist once or twice daily
- Keep the coir damp, not soaked
- Check for sprouting
Most microgreens begin germinating within 2–4 days.
Step 6: Introduce Light
Once the seeds sprout and push upward, remove the cover and place the tray in bright light.
Options:
- Sunny windowsill (6–8 hours daily)
- LED grow light (best for consistent results)
Light is essential for strong, green growth.
Without enough light, microgreens become leggy and pale.
Step 7: Water from the Bottom
To prevent mold and fungus, avoid watering from above once greens appear.
Instead:
- Pour water into the bottom tray
- Let the coconut coir absorb it naturally
- Empty excess water after 30 minutes
Bottom watering keeps stems dry and roots happy.
How Long Do Microgreens Take to Grow?
Microgreens are incredibly fast.
Most varieties are ready in:
- 7 to 14 days
Radish may be ready in 7 days, while basil takes closer to 14.
They’re perfect for impatient gardeners!
When and How to Harvest
Harvest when microgreens are:
- 2–4 inches tall
- Have their first true leaves
- Bright green and standing upright
To harvest:
- Use clean scissors
- Cut just above the coconut coir surface
- Rinse gently and dry
Fresh microgreens taste best immediately but can be stored in the fridge for 3–5 days.
Best Microgreens to Grow in Coconut Coir
Some varieties grow especially well in coconut medium:
Beginner-Friendly Options
- Radish (fastest)
- Broccoli
- Mustard
High-Yield Greens
- Sunflower
- Pea shoots
Flavor Boosters
- Basil
- Cilantro
- Arugula
Start with radish or broccoli if it’s your first time—they’re almost foolproof.
Common Problems (And Easy Fixes)
Even simple growing can come with a few challenges.
Mold on the Surface
Cause: Too much moisture or poor airflow
Fix: Bottom water, reduce misting, add airflow
Microgreens Falling Over
Cause: Not enough light
Fix: Move closer to sunlight or use a grow lamp
Slow Germination
Cause: Old seeds or dry coir
Fix: Use fresh seeds and keep moisture consistent
Yellow Leaves
Cause: Lack of light
Fix: Increase light exposure immediately
Why This Method Is Perfect for Small Spaces
Growing microgreens in coconut coir is ideal for:
- Apartment balconies
- Kitchen counters
- Dorm rooms
- Indoor gardens
- Winter growing
You don’t need outdoor space at all—just a tray and a little light.
Final Thoughts: Fresh Greens Made Simple
Growing microgreens without soil proves that gardening doesn’t have to be complicated.
With coconut coir, you can enjoy:
- Clean indoor gardening
- Super fast harvests
- Healthy, nutrient-rich greens
- Minimal effort and mess
Whether you want to boost your salads, decorate meals, or start a sustainable home-growing habit, microgreens are the perfect place to begin.
So remember:
No soil, no problem—just coconut, seeds, and fresh greens in days.