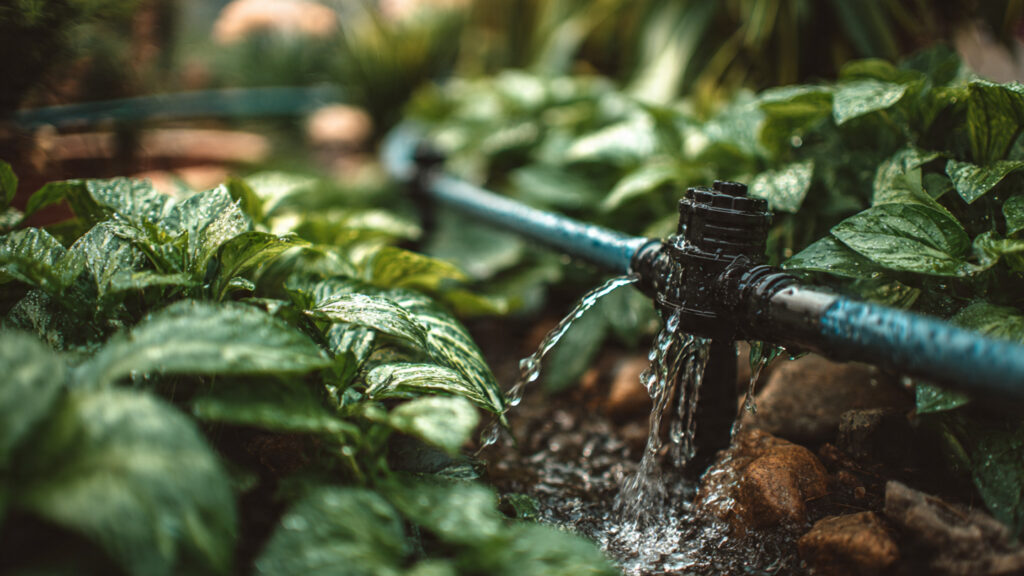
Water is the lifeblood of any garden, but providing consistent, efficient watering can be a challenge. Overwatering wastes resources, while underwatering stresses plants and reduces yields. Enter drip irrigation, a modern gardening solution that delivers water directly to plant roots, conserves moisture, and promotes healthier, thriving plants. But you don’t need to buy expensive kits—DIY drip emitters allow you to create a custom system at home that suits your garden perfectly.
In this guide, we’ll show you how to make your own drip emitters, why they benefit your plants, and how to maintain a DIY drip irrigation system for maximum efficiency.
Why Drip Irrigation Works
Drip irrigation is one of the most effective watering methods for gardens, vegetable plots, and potted plants. Its benefits include:
- Efficient water use: Water goes directly to the soil near the roots, reducing evaporation and runoff.
- Healthier plants: Consistent moisture promotes strong roots, better flowering, and higher yields.
- Time-saving: Automating watering allows you to focus on other gardening tasks.
- Reduced disease: Keeping foliage dry minimizes fungal diseases and leaf rot.
Unlike sprinklers, which wet the leaves and waste water, drip irrigation provides targeted hydration where plants need it most.
Understanding Drip Emitters
Drip emitters are the heart of a drip irrigation system. They control how much water flows to each plant, typically delivering a slow, steady stream over time. Commercial drip emitters are available in various flow rates, but you can easily create your own using simple materials.
DIY drip emitters give you the flexibility to:
- Adjust flow rates for different plant types.
- Customize placement based on root zones.
- Expand or modify the system as your garden grows.
Materials Needed for DIY Drip Emitters
To make your own drip emitters, you’ll need:
- Plastic tubing (¼ inch or ½ inch) for water lines.
- Plastic bottles (500ml–1L) or small containers for slow-release systems.
- Pins or small nails to create tiny holes.
- Scissors or a knife for cutting tubing or bottles.
- Optional: Hose connectors, T-joints, or stakes to secure tubing.
These materials are inexpensive, widely available, and can often be repurposed from items around your home.
Method 1: Bottle Drip Emitters
One of the simplest ways to create a DIY drip system is by using plastic bottles:
Step-by-step:
- Poke several small holes (1–2mm) in the bottle cap.
- Fill the bottle with water.
- Bury or place the bottle upside-down near your plant’s roots.
- Adjust the number or size of holes to control water flow.
Tips:
- Larger plants may require multiple bottles or bigger holes.
- Place bottles on a slight slope to increase water pressure if needed.
- Refill regularly, or connect to a larger water source for continuous watering.
Bottle drip emitters are ideal for potted plants, raised beds, or small garden areas.
Method 2: Pin-Hole Tubing Emitters
For a more permanent system, use plastic tubing with tiny pinholes:
Step-by-step:
- Lay tubing along rows of plants, keeping it near the base of each plant.
- Use a pin or needle to create small holes at intervals, ensuring each plant receives water.
- Connect tubing to a hose or water supply.
- Secure tubing with stakes or clips to prevent movement.
Tips:
➡️ How to Grow Malabar Spinach from Cuttings for Fast, Easy Greens
➡️ How to Grow Super Delicious Cabbage at Home Without a Garden
➡️ How to Grow Bean Sprouts at Home in Plastic Bottles Easily (Step‑by‑Step Guide)
➡️ Why is Your Lemon Tree Blooming in the Heart of Winter?
➡️ Why Should Your Garden Have a Dedicated Pollinator Highway?
➡️ Why Do Your Fruit Trees Need a Winter Wash to Thrive in Spring?
➡️ How Can Rice Water Transform Your Fruits into Sweeter Delights?
➡️ Jumpstart Your Winter Garden: Seed Starting Under Lights
- Test the system by turning on water and observing flow. Adjust hole sizes if necessary.
- Space holes based on plant size and root depth. Larger plants need more water.
- Use a filter at the water source to prevent clogs from dirt or debris.
Method 3: Drip Stakes for Potted Plants
Another DIY method is using drip stakes, which work well for containers:
Step-by-step:
- Use a small plastic bottle or container with a tiny hole in the cap.
- Attach the bottle to a stake or stick.
- Insert the stake near the root zone of the plant.
- Gravity allows water to drip slowly into the soil.
This method provides steady hydration for potted vegetables, flowers, or herbs, reducing the risk of overwatering.
Tips for Optimizing Your DIY Drip System
- Monitor flow rates: Too fast and water will run off; too slow and roots may dry out.
- Use mulch: Cover soil around emitters to reduce evaporation and retain moisture.
- Adjust placement seasonally: Roots grow and expand; move emitters as needed.
- Check for clogs: Clear small holes with a needle if flow decreases.
- Automate with timers: Connect bottles or tubing to a simple timer for hands-off watering.
A well-maintained DIY drip system can last for multiple seasons with minimal effort.
Benefits Beyond Water Efficiency
DIY drip irrigation isn’t just about conserving water; it also promotes thriving plants:
- Improved root growth: Slow, consistent watering encourages roots to grow deep.
- Less stress on plants: Even hydration prevents wilting and nutrient imbalances.
- Increased yields: Vegetables and herbs produce more fruit when consistently hydrated.
- Flexibility: Systems can be customized for every type of plant in your garden.
By creating your own emitters, you gain full control over water distribution, ensuring each plant thrives.
Common Mistakes to Avoid
Even simple DIY drip systems can have issues. Avoid these common pitfalls:
- Holes too large: Water flows too quickly, wasting resources.
- Uneven spacing: Some plants may be overwatered while others dry out.
- Ignoring plant needs: Different species require different water volumes.
- Failure to check flow regularly: Dirt, algae, or mineral buildup can block holes.
Routine checks and adjustments will keep your system efficient and effective.
Conclusion: DIY Drip Irrigation for Thriving Plants
Creating your own DIY drip emitters is an easy, cost-effective way to ensure your garden thrives. Whether you use bottles, pinhole tubing, or stakes, a properly designed drip system delivers consistent water to plant roots, saves time, conserves water, and improves plant health.
With attention to flow rates, placement, and maintenance, DIY drip irrigation can transform your gardening experience, making your plants stronger, healthier, and more productive. Even small gardens or container setups can benefit from this technique, ensuring every plant receives the hydration it needs to flourish.
✅ Action step: Start today by selecting a few plants for your DIY drip emitter system. Experiment with bottles or tubing, monitor flow rates, and watch your plants thrive with minimal effort and maximum efficiency.
If you want, I can also create a version with SEO optimization, meta description, and internal link suggestions, making it perfect for a gardening blog post that attracts readers searching for drip irrigation tips.